 Are you struggling to create online Forms? Looking for an easy, simple way to design free Subscribe Forms and create great Optin Forms online? Here’s how to make free web forms using the MailChimp Form Design Software called ‘Create Forms’.
Warning: It’s not easy, unless you know how. But no worries! This article collects together all the relevant articles from MailChimp’s Subscribe Form Support, and puts them all together, into one place – plus….and this is the real clincher: lots of must-have additional info that I got via some frantic to-and-fro emails with their Support staff.
This extra info makes the difficult task of creating online forms easy. These extra explanations are essential, and will save you hours/days of frustration – believe me. Never has my reserve Motto of ‘I Do The Hard Work So You Don’t Have To’ been more appropriate! Anyway, onward friends……buckle up, and follow me!
MailChimp’s Create Forms System
At MailChimp’s ‘Create Forms’, you can create and design a very nice, personalized Subscribe Form, plus a sequence of fully automated, Double Opt-in ‘Confirm Subscription’ and ‘Welcome!’ emails. But! Creating forms involves building, designing and uploading forms, and is one of the most frustrating things you will ever have to do as a blogger. But worry not, friends, you’re in the right place, and I’m here to help…..
MailChimp’s sequence of Subscribe, Opt-in, and Unsubscribe Forms includes
Subscribe Sequence:
- Subscribe Form
- Signup Form With Alerts:- a Text alert becomes visible if someone makes an error or omission during signup
- Signup ‘Thank you’ Page
- Optin Confirmation Email
- Confirmation ‘Thank you’ page
- Final Welcome Email
The Unsubscribe Sequence: Includes 4 Forms or emails
The Update Profile Sequence: Includes 5 Forms or emails
I can tell you, friends, I’ve really earned my chips this week! Buckle up for some detailed info – but it’s also going to save your sanity if you are planning to add a Subscribe Form to your website.
Back on Topic!
The Subscribe Form is the Form you must set up first. And you design it using MailChimp’s ‘Create Forms’ software. You have 3 design options for your Subscribe Form:
- You can create your own original design color scheme using MailChimp software
- You can get MailChimp to sync the design of your Form to your own Website’s color scheme. You can then use that as the base color palette, and add, tweak etc everything after that.
- You can use one of the many pre-designed color schemes provided by MailChimp. (I’m using MailChimp’s Facebook color scheme for my Subscribe Forms).
Here is a Link to some really useful: Tips for Designing & Customizing Your Signup Forms:
That link above, takes you to what is really MailChimp’s Subscribe Forms Help Index. [So in MailChimp lingo, Tips = Index??] But lets move on…
There are a lot of links to other Help Sections there, but don’t feel you have to read through all of them right now. Use it as a go-to Reference if you need specific Help on a particular ‘How To’ designing topic.
Once you have designed the Color schemes and layout of your Subscribe Form, (N.B. design your Subscribe Form first), all the rest of your Forms for Subscribing, Unsubscribing and Profile Updating will all be automatically co-ordinated with that first Subscribe Form Design theme.
This makes the appearance of all of your 15 Forms consistent with your initial ‘Subscribe Form’ Design.
MailChimp will also add Default Texts to all of the rest of your Forms in all the Sequences. This means that you will not have to re-design and setup each of these follow-up Forms from scratch:-
Once you’ve designed your first Form: the Subscribe Form, all you have to do, is to go through the rest of the Forms in the Sequences, and add or change the Text or Formatting if you choose to do so.
All your Forms in the sequence will already be consistent with your first Subscribe Form design features. You only have to tweak the Text, and Text layout, that you want to use.
Then all of your 15 Forms that make up the 3 Email Sequences are all done and dusted – 15 emails or Forms in total, and all with a consistent Design Theme.
The use of the same color scheme theme throughout all the forms, provides continuity of design, and is generally thought to be desirable.
Here’s a link to MailChimp’s Online Training: Getting Started
Summary So Far:
Using the MailChimp ‘Create Forms’ software, you will be able to
- design a series of Signup Forms and emails by choosing your own color schemes, or by using one of the pre-designed Mailchimp color schemes
- be able to choose to Add or Hide whatever Fields you wish to include or exclude from your Forms
- add and format Text, Images, and logos
- design your Forms to have pretty much anything you like.
Important Point! Pay Attention* or Face Hours (Days?) of Frustration!
However, you will not be able to directly install your personally designed Subscribe Form (the first Form in your sequence of Subscribe Signup forms and emails), directly into your blog’s sidebars in a way that makes your original, personally designed Subscribe Form, viewable in a sidebar on your website
This limitation only applies to the first in your sequence of Signup Forms – the Subscribe Form. That is because the ‘Subscribe Form’ you make in Create Forms, is wider and bigger than the width of most sidebars (their explanation), and MailChimp software will not ‘allow’ you to fit it into a sidebar!
I wish someone had told me that before I had to spend days pestering their Email Support several times before I got an explanation of the above. [Aside to MailChimp: Why????? I have asked them…watch this space  ]
]
However, Links to your personally designed Subscribe Form can be added to sidebars, Facebook, and Twitter etc – see below for details at ‘Add a URL Link’
Or, one option (one of two) for adding a Subscribe Form to your sidebar is, you can choose to add smaller and simpler, less wide, MailChimp Subscribe Forms that still funnel your subscribers into your beautifully designed Sequence of Forms, but not via the first Form of your sequence, the wide Subscribe Form. See below for more about this at ‘Embedding HTML code’.
The various options for adding a smaller, basic version of a Subscribe Form directly into your sidebar (so it is visible as an actual Form, not just a URL link) are found at the ‘Share It’ section of ‘Create Forms’
3 Ways** to Add a Subscribe Form to Your Website
1. Add a URL Link that leads to your Mailchimp Personalized Subscribe Form.
You can add a Link to your Personally Designed (and wider) ‘Subscribe Form’ into your Sidebars – or anywhere you wish. This link (a URL that’s linked to your personally designed wider Subscribe form) can be added to your site via a Text Widget in your WordPress Dashboard. This is done in the same way you would use any Text Widget.
For example your Text Widget could say, ‘Subscribe to our Newsletter’ and the link to your fancy personally designed Subscribe Form is embedded in that line of Text.
I have 2 of these URL links in my sidebar: one right above my Subscribe FORM – see below for how to design and install that Form – and one low down in my Sidebar above the Secure Site Logo.
If you click on either of those red ‘Subscribe to Our Newsletter” URL links (please do  ), you will be taken to my Personally ‘Designed with MailChimp’s Create Forms’ Subscribe Form, with it’s ‘MailChimp Facebook color palette’ color scheme..
Here is a MailChimp Support video tutorial showing how to use various the ‘Share It’ options, including the Add a URL Link to your website.
See: How Do I Share My Signup Form?
Anyone clicking on your personalized URL Link will be taken to your beautifully designed MailChimp Subscribe Form. And when they enter their email address and click ‘Subscribe’, they get automatically funneled into the automated Sequence of Double Optin and Welcome emails you set up and designed at MailChimp ‘Create Forms’.
This Link (the URL for your personally designed, wider Subscribe Form) is found at the Share It option at Create Forms.
At the ‘Share It’ section of Create Forms, you will also find some other ways to add a directly visible Subscribe form to your website – Subscribe Forms that will funnel Subscribers into your personally designed automated MailChimp sign up Sequences of forms:
2. Embedding HTML Code for Smaller ‘Mini’ Subscribe Forms:
If you choose this Embedding option at MailChimp’s ‘Share It’, you can embed a choice of 3 styles of smaller, simplified, basic Mini Subscribe Forms (the first Form in your Signup sequence of emails) that will fit nicely into most Sidebars, and be directly visible as a Form in the sidebars of your website.
Although these smaller and simpler Subscribe Forms are not your personally designed (wider and larger) Subscribe Form, they still funnel subscribers into your personally designed Sequence of Double Optin and Welcome emails.
You have a choice of a Super Slim Form, a Classic Form, or a Naked Form.
This MailChimp Support tutorial video, and page, explains these Embedded HTML Mini Forms
See: How Can I Add My Signup Form on My Website: Embedded Form
If you choose one of these 3 simplified, smaller, Subscribe Forms, MailChimp will provide you with the HTML Code for a simple pre-designed Subscribe Form. These simpler smaller Subscribe Forms have a Heading, plus a Text Box for subscribers to type in their Email Address.
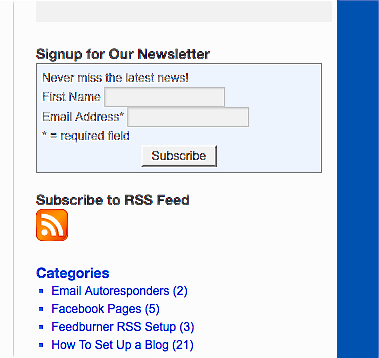
Here is a Screen shot of my previous Embedded Mini Form:
These basic features allow you to collect your Subscriber’s email Contact details, which MailChimp automatically adds to your MailChimp Subscriber List.
Although these Simplified Subscribe Forms are not the wider, fancy Subscribe Form you designed with the Mailchimp Create Forms software, anyone who Subscribes via any of these simpler and smaller forms, will still be taken automatically into your personalized Sequence of Double Optin, Confirm Subscription and Welcome emails that you did personally design with the Mailchimp ‘Create Forms’ software.
3. Use a Mailchimp Plugin to design and Upload a Customized Subscribe Form to your Sidebars.
If you choose this option, you will have to design a new Subscribe Form within the MailChimp Plugin. But this can be easily done in the Plugin’s own Settings once it is installed. The MailChimp Plugin’s Settings are accessed from your WordPress: Dashboard> Settings>MailChimp Plugin.
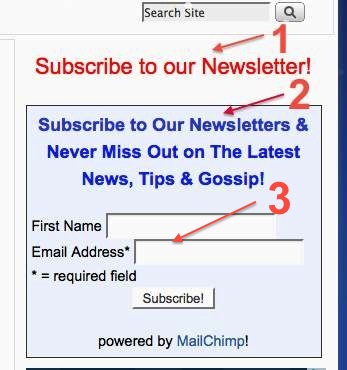
Here’s a screen shot of my Form as I designed it using the Mailchimp Plugin: 
- My URL Link that takes you to my larger MailChimp ‘Create Forms’ designed Subscribe Form – Option No 1 in 3 Ways to Add a Subscribe Form (above).
Note: I added this Mailchimp URL Link that takes you TO my Main Mailchimp-designed Subscribe Form into the Header Section of my Plugin-designed Subscribe Form! I feel like bragging just a little about what a clever idea that was, but I won’t….
So my Plugin-designed Subscribe Form kills 2 birds with one stone….although that might not be an appropriate metaphor to use in the circumstances….Carol! Focus!!
2.My Plugin-designed Subscribe Form: Text.
3. The Plugin-designed Subscribe Form: Text Boxes I chose to have on my Form.
I’m using the MailChimp plugin Version 1.2.10 By MailChimp and Crowd Favorite | Visit plugin site to design the Subscribe Form you can actually see in my right hand sidebar. But… the only way you get to see my you-beaut, fantastic, stunningly designed Optin Forms, is by entering your Email Address into that Form in my sidebar, and clicking Subscribe. ![]()
This video explains how to use plugins to create and add a Plugin Generated Subscribe Form to WordPress.org websites:
See: MailChimp and WordPress
Once you have designed your Subscribe Form in the MailChimp Plugin, you can add the ‘Plugin designed’ Subscribe Form into your Sidebar, and link it up to your MailChimp account.
The video above explains how to do that.
If you choose to use this option of using a MailChimp Plugin to design your visible-on-website Subscribe Form, you will have a visible and clickable Subscribe Form in your Sidebar, which is more Customized than using any of the Embed HTML simplified smaller Mini Subscribe Forms, that you can add directly from MailChimp’s ‘Share It’ section of Create Forms.
I’ll Repeat This To Make Sure It Is Clear:
When someone enters their email address into that ‘Plugin designed and generated’ Subscribe Form in your site’s sidebar, and clicks ‘Subscribe’, they get taken automatically through to your ‘personally-designed-at-MailChimp’ Sequence of MailChimp Double Optins and Welcome Emails.
But, they will not enter your Opt-in system, via the personally designed Subscribe Form you made in MailChimp’s Create Forms. They enter via the Plugin generated Subscribe Form, but then get funneled straight through to your Sequence of MailChimp Optin and Welcome emails that you did design in MailChimp’s Create Forms.
Examples from My Site of the 3 Different Methods of Adding Subscribe Form Links:
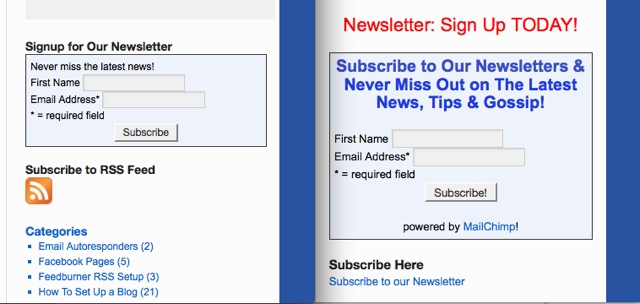
Methods 2 and 3 above: Here is a side-by-side comparison of my ‘Create Forms’ MIni Form: No 2 method (left,) and my Plugin-Designed Form: No 3 method (right).
And at the lower end of my sidebar, just above the S2Member Secured Site banner, you can see the text ‘Subscribe to Our Newsletter’, which is another example of how I’ve added my ‘Add URL’ LInk: No 1 method, using a standard WordPress Text Widget.
All 3 of these different Linking Methods take you To my larger Mailchimp ‘Create Forms’ designed Subscribe Form.
3 More Ways to Use ‘Share It’ to Share Your Subscribe Form
4. Facebook and Twitter: Add a Link to your Personalized Subscribe Form.
This option is also found at MailChimp’s ‘Share It’ section of Create Forms.
All you have to do it to click on ‘Share on Facebook’ at ‘Share It’, and MailChimp takes you to your Facebook Timeline. There you can easily add a clickable ‘Subscribe Here’ Post into your Timeline with a link to your personalized Subscribe Form.
This ‘Add to Facebook’ system also does not add a visible version of your fully designed larger Subscribe Form directly into your Timeline, but a click on the Post you just added to Facebook, does take you to your fancy Subscribe Form, plus the automated sequence of Signup Emails set up at Mailchimp.
4a. You can also choose to ‘Integrate with Facebook’ and use an app that shows up in the Apps section of your Facebook Page:
see: How Do I Integrate Facebook with MailChimp
4b. Or ‘Add MailChimp Subscribe Form to Facebook Pages’:
see: How Do I Add a MailChimp Signup Form to My Facebook Fan Page
5. Subscribe via Mobile Phones Using QR Code
At ‘Share It’, you can also get a QR Code for your Subscribe Form that you can choose to add anywhere you like – FaceBook, personal emails, business emails, web pages etc. A QR Code allows people to subscribe to your website via their Mobile Phone.
Details about QR Codes and how to use them is found here: Subscribe Form QR Code
6. Host Your Own Subscribe Forms
You can also choose to host your own Subscribe Forms, but this requires a bit of HTML knowledge. The Support video that explains this, can be found here:
See: Can I Host My Own Signup Forms?
Alright! That’s it! That pretty much covers all the bases of ‘Create Forms’ at MailChimp.
Give yourself a Bonus, or at least a pat on the back. It’s probably not ethical for me to encourage you to celebrate your achievements with fast food…..(leading you astray etc)…..but…..you so deserve a big plate of oven baked chips! and have one for me…..


First off I would like to say great blog! I had a quick question that I’d like to ask if you don’t mind.
I was interested to find out how you center yourself and clear your head
prior to writing. I’ve had a difficult time clearing my thoughts in getting my thoughts out there. I truly do take pleasure in writing but it just seems like the first 10 to 15 minutes are usually lost simply just trying to figure out how to begin. Any recommendations or hints? Thank you!
Hi there, I don’t have any trouble focusing on what I want to say. I think that’s probably because I know what I want to say before I start writing. My articles are mostly ‘how to’ articles, so once I’ve come across something I’ve just learned, and want to tell my readers about, I just start at the beginning and keep going with the explanations until I get to the end.
Also, spending 10 -15 minutes sorting out what you want to say is not long – I definitely take a lot more time than that to think of a topic, do keyword research, think of a good Title etc, etc. If you mean that your head is full of other things, then you will just have to practice focusing on the task at hand, and just doing it.
Pingback: Register? Subscribe? Login? What’s the Difference?
Awesome Tutorial……… Thanks
Thanks Shuvo.
Pingback: Why Free MailChimp Autoresponder is Best for Beginner Blogs
Pingback: Review: MailChimp Free & Pay As You Go Email Autoresponder
I’m sorry to ask a super noob style question, but is there a way I can host the form with Mail Chimp? Better said, do I have to have my own website, or Facebook page to host the form? Or is there a way I can send them to sign up directly on the mail chimp site.
Thanks ahead for your response
Hi Rachel, to have Subscribers, and therefore a Subscriber email list, you have to have something that people want to own/buy from you (a product) or to learn about (information of some sort) sent out to them by email. This means you have to have some sort of internet online viewing platform for them to find out about you in the first place.
I don’t know if you can do this just from Facebook directly.
I do know that almost everyone using email lists has a blog or website platform of some sort as a home base, where they can attract traffic directly from the internet (Google searches), and then they link that up to Facebook, a Youtube channel, Twitter etc to attract social media traffic.
You can then attract and funnel visitors from those social media platforms back to your website/blog where you place your Subscriber form (Mailchimp or any another Email Responder) to build your email list.