 It’s very important for every blogger to have a Contact Form on their blog or website. A Contact Form Page lets our visitors interact with us, and this builds good relationships. Blog owners need to know if our readers are confused, frustrated or angry.
How else will we give our readers what they are looking for? Or know that something on our Blog is not working properly? Building good Customer Relations is vital if we want our website to flourish.
All feedback is good feedback. It really is. If a visitor clicks on our link in a Google search, and then fails to find what they were expecting to find, we need to know about it. And then fix it.
A Contact Form is also handy for when our readers are so impressed with our marvelousness that they need to share. 
We must make it easy for our readers to Contact us for any reason at all.
If our readers are able to participate in our blog, and they know their views and opinions are respected, they will feel good about our blog, and are more likely to return again multiple times. This boosts our visitor numbers.
They are also more likely to make a useful Comment, which boosts our standing in the eyes of Google web crawlers – or click on our Facebook Like button to recommend us to their Facebook friends (please do  ), and recommend our site to their non-Facebook friends as well.
How to Make a Contact Form
To do this we need to make a web Form that allows readers to Contact Us by email. A Contact Form is in fact an Email Form that we add to our blog. To do that, we need to make a Form template with computing software. Not to worry though – Website Form templates are made and built by clever-clogs Geeks who know how to use HTML code, or PHP. These IT geniuses are able to build Contact Form templates in HTML format, so they can be read in normal language by the rest of us.
If you are one of those gifted ones…..Well done lads (usually), it’s appreciated. The rest of us (normal, non-geek people  ) need to know how to find a Contact Form Template that’s already been built for us – one that can be easily installed and set up by the average blogger. To do that we need to find a Plugin.
The Easy Way to Add A Contact Form to Your Blog
Bloggers are always on the look out for the easiest way to get the best – for their readers, and for themselves. The easy way to add a Contact Form to your blog is to find a Plugin that will add the Contact Form for you.
A quick search of the WordPress Plugin Directory gave me 723 to choose from. But never fear, trusty readers: I’ve done the hard work so you don’t have to!
How to Find the Best Contact Form Plugin
I’ve been trying to find the best Contact Form plugin for days – and very frustrating it was too! But never mind that now – as a result of all the research I’ve done, I can now bring you the results of all my labors. Drum roll please, Gladys……
The Contact Form 7 Plugin: For Fully Customizable Fancy Contact Forms!
Contact Form 7 Plugin: Many people recommend the Contact Form 7 Plugin. The Contact Form 7 lets you easily customize your Contact email forms and adds CAPTCHA and Akismet spam filtering support as well.
If you only want to install the basic Default Contact Form, you only have to download and install the Plugin in the usual way – see Facebook Pages How to Install the Socialize Plugin. And then copy and paste the short code from the Plugin’s Home website and it’s all done and dusted. Easy!
However, if you want to, you can also customize the Contact Form itself using the Form builder. You can have multiple Contact Forms for different purposes, customize the text boxes, add links and extra options etc etc. It seems perfect.
In fact, I had finally decided that this plugin was the One For Me, downloaded it from the WordPress Directory in my Dashboard, and clicked Activate…..and hit a snag.
The Jetpack plugin that I already have installed on my sites, conflicts with the Contact Form 7 Plugin. You have to deactivate the Jetpack Contact Form software before you can use the Contact Form 7 Plugin. And to do that, you need to do some fancy geeky stuff. Hmmmm….
Confession Time: The Jetpack Contact Form.
When I installed the Jetpack Plugin, one of its attractions was the number of extra widgets and other extras it gives you. One of these extras is a Contact Form that lets our readers send us an email.
That’ll be a piece of cake, I thought, and also the obvious Contact Form choice for me. But…do you think I could work out how to actually put it on my blog? Aaaah!
However, the good news is that it really is easy….once you can work out how.
And no, you do not go and download the Grunion Contact Form Plugin as recommended for installation of the Jetpack Contact Form on a self hosted WordPress.org blog. I installed the Grunion plugin ok, but it refused to Activate. I tried many times. But….
Good News!
You do not need to download or install anything extra if you already have the Jetpack Stats Plugin installed on your Blog.
Ok people, here’s how you can install the easiest of all Contact Forms: at least…easy when you know how.
How to Add the Jetpack Contact Form to Your Blog
First of all, Install the Jetpack Plugin.
See how to do that here: Jetpack Plugin for Instant Stats on Your Dashboard.
Now Install the Jetpack Contact Form:
See screen shot below:
1. Add New Page:
this will put your Contact Page in your Menu bar at the top of your Home Page. There it will be visible from anywhere on your site
2. Name your page: Contact or Contact Us – or something similar
3. Make sure you are using the Visual editor option at top right of the editing text box, not the HTML editing option – is anyone ever going to be in the HTML option by default?….but, moving right along…
4. Click on the last icon above the Text Box that looks like a Contact Form – why could I not see this 5 days ago???
If you hover your mouse over that Icon, it shows ‘Add a Custom Form’
5. Click on that Icon
6. Be prepared to be amazed……
Your screen seamlessly shifts to a default Contact Form! How easy was that!
And the Jetpack Contact Form has built in Akismet anti-spam filters to stop those pesky scanners from gatecrashing the party. It’s a simple Contact Email Form. It’s easy to install and setup. It’s perfect.
Congratulations! You now have a Contact Form installed on your blog.
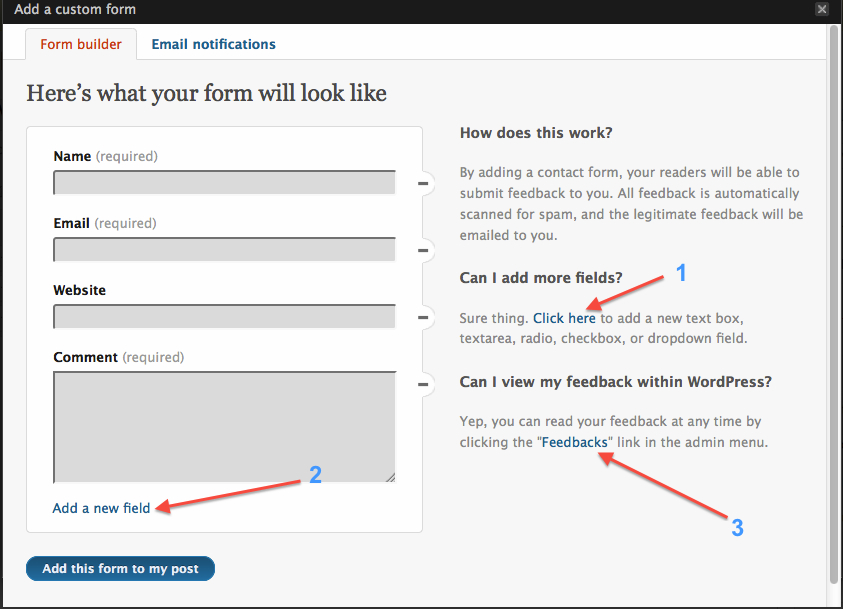
You are now in the Jetpack Contact Form Builder. Here is where you can customize what will appear on your Contact Form.
Do You Want To Get A Little Bit Fancy? – and who doesn’t?
If you want to get fancy, follow from numbers in the graphic above:
1. Add a new Text Box
2. Add a new field
3. You will be able to keep track of your Contact emails by checking your Feedback tab that Jetpack has added to your WordPress Dashboard Menu – the left hand sidebar of your Dashboard.
Yes, everything is done from inside your Dashboard. There’s no need to go to your cpanel, or your blog’s Email accounts. Your Contact email messages reach you in the same way Comments on your Blog do – on your Dashboard and in your specified private email inbox. You can read them, and reply to them, directly from your WordPress Dashboard.
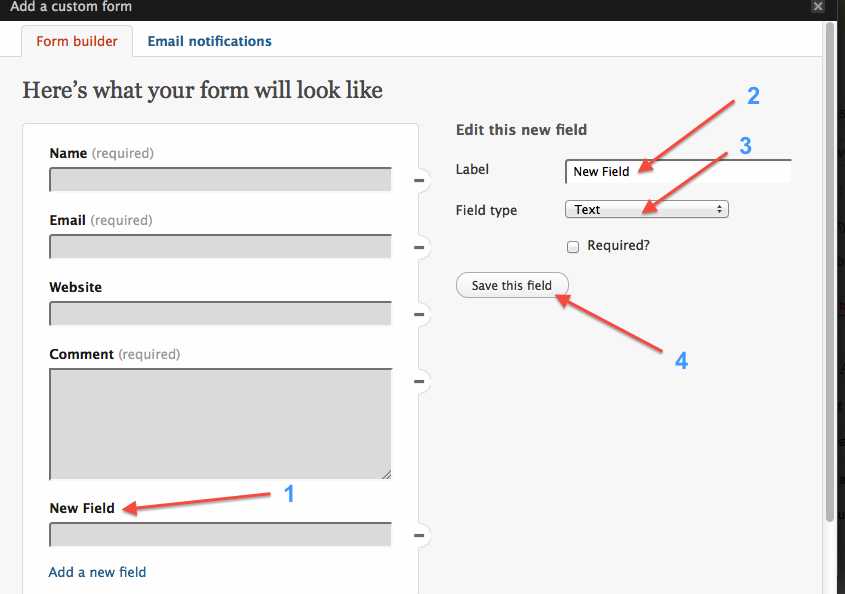
If you click on the Add New Field (1 below), you will see this:
Here you can choose the label (2) – i.e. the name of your added field, and the Field Type (3).
When it’s setup as you want it, click Save this Field (4).
We’re nearly done! 
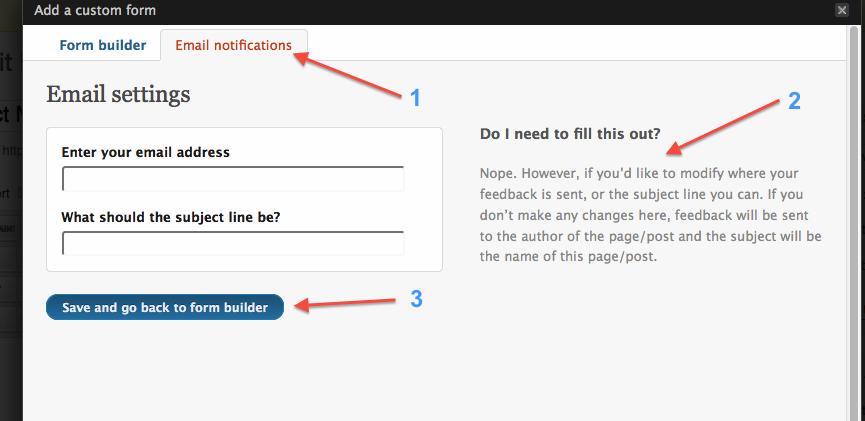
But before you click the Add Form to Blog tab at the bottom of the form, we need to check out the Email Notifications (1) options by clicking on the tab at the top of your Jetpack Form Builder.
You probably don’t need to change anything here, but you can if you want to (2).
Alright! Click ‘Save and go back to Form Builder‘ (3) and then click ‘Add Form to Post‘ and…….don’t panic!
You will see some HTML code in the Text area of your New Page. Don’t change anything.
Just click the WordPress ‘Publish’ button, and your clever WordPress blog will turn that HTML code into a fully functioning, you-beaut Email Contact Form!
Check out my shiny new Contact Form that is now there in my Menu at the top of every page.
Pretty cool eh? Why not drop me a line and give me some feedback – all feedback is good! If you have any ideas about a topic you would like me to cover, Contact Me! Easy as….
………Cue Motto!


this is very very incredible tips.every man can do follow this tips for his/her blog.thanks you
i created a form to receive a free report.
is there a way to send pdf of free report automatically after they submit?
I see you are commenting on the Contact Form post. When someone uses the Contact Form, you will get a notification email which you can reply to. It also shows up on your Dashboard. However, you would have to reply to that person and then add the download link into that reply, which is not ideal.
That is not really the purpose of a Contact Form. Contact Forms provide a Private email service for visitors to your blog who want to Contact you but don’t want to use the public Comment box.
What you need to set up is an Autoresponder system, such as MailChimp or Aweber or others. Aweber costs $19 per month which is a lot of money if you are just starting out and/or have a small subscriber list.
MailChimp is free and perfect for small lists, and even if you want to have every single step fully automated, it will only cost you 3 cents per email.
If you set up a MailChimp sequence of Subscribe Forms, you can design your Subscribe Form with a message such as ‘Get Your Free Report Here’, or similar. Then you can add the download link into one of form in the Subscribe sequence of emails.
For example, they enter their email address, then they receive the Confirmation email, and when they click on the Confirm Subscription link, they will get a ‘Thanks for Subscribing Message’. You can add the download link into that message. Job done.
Check out my 3 MailChimp Articles in Category: ‘How to Set Up a Blog’. They will explain everything you need to know.