Creating simple Drop down menus is much harder than you think. About 99% of all dropdown menu methods require the use of HTML & CSS. Even Drop Down Menu Plugins require HTML & CSS. I live in the real blogging world (my excuse) so I needed to find an easy way to make a Drop Down Menu for WordPress, without the need of HTML or CSS.
Do I Really Need to Create A Drop Down Menu?
Not sure of why you need a Drop Down Menu? Check out my previous article: Drop Down Menus: 5 Good Reasons Why You Need One. My particular reason for needing a Drop menu was to solve the problem of my Time Out! Page.
Until a few days ago, I had my Time Out! Page as a single Page, with Page Breaks for each new topic. That meant that it showed on the Blog as one Page in the top horizontal Menu, next to Home, Contact and Sitemap. The problem was that readers had to click on the numbers at the end of each page break, to read the next post.
That system worked OK, but it’s been bugging me for ages. I really wanted to have each separate topic in Time Out with it’s own page, and accessible from a drop down menu at the top of every page and post. But …you guessed it …I didn’t know how to make a simple drop down menu.
BUT……good news! I’ve cracked how to do it. Not only that, I did it without using any HTML or CSS! But boy, it was a real struggle to find out how it can be done. I’m still just a novice (normal) in those computer-programming languages of HTML & CSS – the language spoken in the land of the clever-clogs geeks.
But, after struggling mightily for several days….. I have triumphed over adversity on behalf of all Non-Geek Bloggers (and myself)! This is an ‘anyone-can-do-it’ easy way to create Drop Down Menus in WordPress…that does not require any knowledge of HTML or CSS. No, no…no need to thank me…. just send cash.
Here’s how it’s done:
How to Make a Drop Down Menu in WordPress: No HTML Required!
This method allows you to add any item that has it’s own URL on your blog, into a drop down menu that drops down from your main Menu Navigation Bar on a WordPress blog or website. Items that have their own URL include Pages, Posts, Categories, Archives or anything else that has it’s own individual URL address, including photos, audio recording or videos.
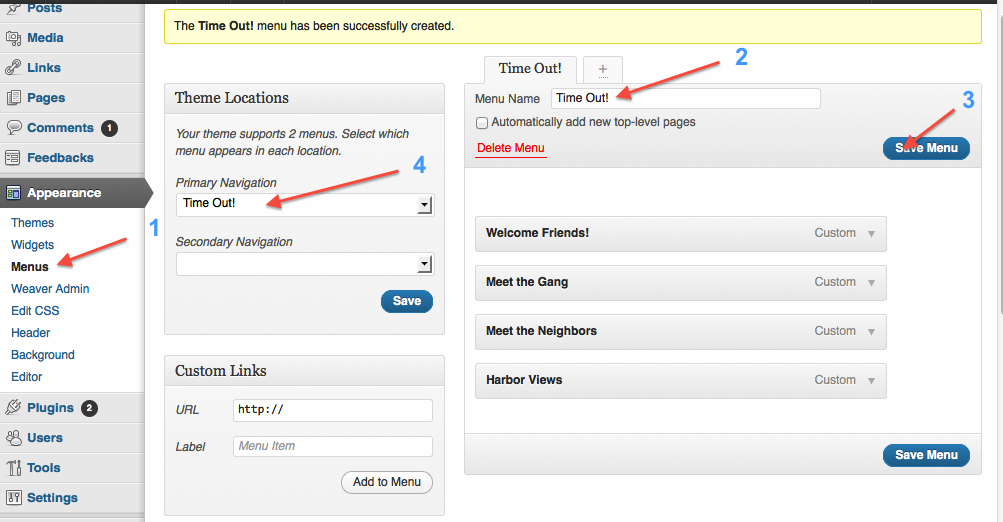
Follow the numbers in the graphics, and the text below.
1. Go to Dashboard>Appearance>Menus – click the Plus sign at the top of the second column to create a new menu – above Time Out (No2 arrow) in the graphic below.
Now, follow the text and numbers:
2. Type in the title for your Drop Down in box ‘Menu Name‘. In my case it’s called Time Out!
3. Click ‘Save Menu’
4. Select the name of your Dropdown Menu at the ‘Primary Navigation’ text box and click ‘Save’.
Organize Your items, Ready to Add to Your Drop Down Menu.
Everything you add to your Drop Down Menu must have it’s own URL. In my case. it was all my previous Menu Items, (Pages, not Posts): Home, About, Contact, Sitemap (Names/Labels), plus a Drop Down Menu Name/Label, under which I would add drop down pages for the multiple new Pages I had created by chopping up what was previously my long, single WordPress ‘Page’ called ‘Time Out’.
Aside: Before making my Drop Down Menu, I first had to go through my previous single Time Out Page and make individual Pages out of each of it’s sub-sections, by copy/pasting each one of the sections into it’s own new individual Page. That was how I gave each previous sub-section, it’s own URL’s, so I could add them so they dropped down (underneath the title Name/Label ‘Time Out‘) in my new Drop Down Menu.
At this construction phase, I kept these new Pages as ‘Private’ – i.e. not ‘Public’ – you control the Public/Private option in the Dashboard in the Draft, Update, Publish section at top right of an ordinary Edit Post screen. 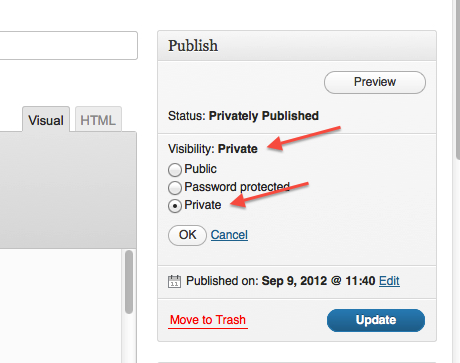
That was so I could work on my Menu and the Pages to add to my Drop Down Menu in ‘private’, before unleashing them on an unsuspecting world.
Hot tip: aiming for perfection does not make for an easy life, but it does make for a Successful Life – My Free Bonus Lifestyle advice… no charge.
Now we can start adding URLs for any items we want to add to our new Menu.
Staying on the same Dashboard Menu screen, look on the left hand column of options (on my screen that’s where it is) for the box titled Custom Links:
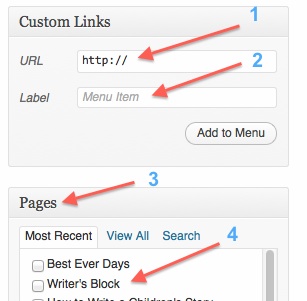 1. Type into the ‘URL’ box, the URL of the Page you want to add to your Menu. Most people would want to add their ‘Home’ Page first.
So I typed in the URL of my Home Page: http://www.mysecondmillion.com.
2. And below that in the ‘Label’ box, I typed Home.
(I’ll explain steps 3 and 4 in a sec.)
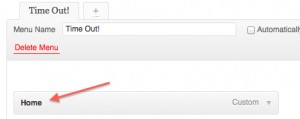
Click ‘Add to Menu’. And there it is in the right hand column of that same screen, where I’m building my new Menu! See below.
Next I added my About, Contact, and Sitemap, pages into the new Menu in exactly the same way.
NOTE: You can switch the order of items in your menu by dragging them up and down in the right hand column with your mouse, in the same way you can shift your widgets up and down in your Dashboard sidebars.
Then I added my new Time Out! first page in the same way.
Important: All those Menu items will appear on your visible Blog, next to each other, spread out horizontally across the Menu bar, because they are all aligned hard Left underneath each other on the Dashboard Menu screen.
How To Add The Drop Down Pages to the Menu Navigation Bar
Then I started to add my new Pages that I wanted to ‘Drop Down’ from underneath my Time Out! title in the main Horizontal Menu navigation bar.
NOTE: Depending on your Theme and WordPress version, you will see some or all of your site’s Pages listed under the area called Pages (No 3 in the graphic above). If they appear there (No 4), you can simply select them. and click Add to Menu. That will automatically add them up into the Custom LInk>URL box – (No 1) in the above graphic.
If you want to add a URL that does not appear there under Pages, you use the Search option in that ‘Pages’ section of the Menu builder, or just type it’s URL into the URL box further up in ‘Custom Links’.
Making Your Menu Items ‘Drop Down’ Below a Menu Header
This is the fun part! And the ‘Eat My Dust, all you Clever-Clogs Geeks!’ part……
Make sure you have your Top Menu Items situated in the order you want, and all aligned hard left in your Dashboard Menu builder space. In my case, they were Home, About, Contact, Time Out, and Sitemap.
Make sure all the items you want to Drop Down are placed below the Main top Header item you want them to drop down from:
In my case in my Dashboard Menu screen, I had my new individual Time Out pages. such as Welcome Friends, and Meet the Gang, all lined up underneath my Main ‘Time Out’ header – still all aligned hard left.
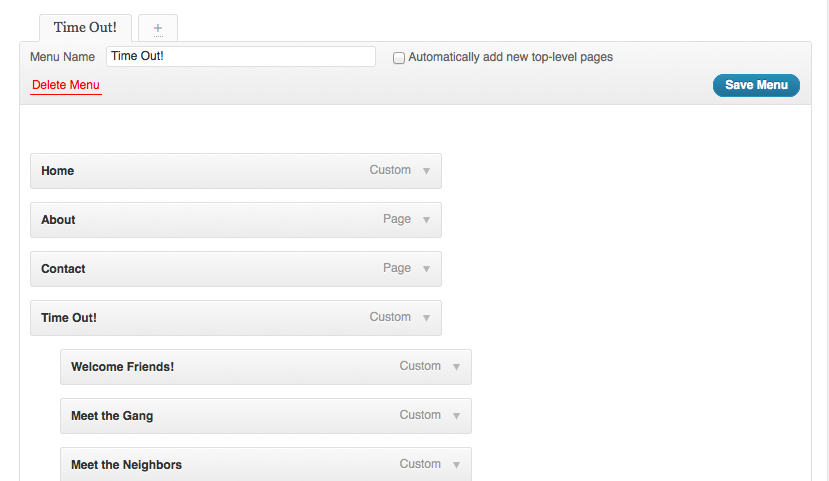
Now! Using your mouse, grab the first page that you want to ‘drop down’ (currently aligned hard left), and drag and drop it a bit to the right. In my case, the first Page I dragged to the right was the Page: Welcome Friends. Because that was the page I wanted to appear first in the Drop Down Part of my Main Menu (under Time Out! in the Top Horizontal Navigation Bar)
Do the same for all the other Pages you have, that you want to keep dropping further down, under that same Top Menu Header – in my case, these were all the pages I wanted to be dropping down from under my top Time Out Header title.
Make sure all the ‘drop down’ Pages are all aligned a bit to the right, and directly under each other, under your first ‘moved’ page. In my case, these were pages called Meet the Gang and Meet the Neighbors etc, all aligned a bit to the right of Time Out! in the Main Menu, but all in line with each other – see below:
Save Menu at the foot of your newly built menu.
If you have been working on your menu with your new Pages in ‘Private’ mode. Now go and click them all to show ‘Public’. And also click ‘Publish’. I can’t quite remember, but you may have to do this before you can shift them to the right, but maybe not.
Prepare yourself for greatness.….and click ‘Save Menu’ at the top, next to Menu Name.
Go and check out your Handiwork! Not bad eh? ![]()
After you’ve made your Drop Down Menu, check to see all the pages are there in your Menu, and that all of the Menu Links take you to the right place on your blog.
Trouble Shooting.
1. Your drop down titles are spread horizontally, not vertically.
This means you have not lined up your different pages in your Menu Dashboard correctly. Pages you want to appear horizontally across the top of your Home Page must all be hard left in the menu builder.
Pages that you want to Drop down, must be slightly to the right of their top Heading in Menu, and all aligned in line, and vertically above each other.
2. Some Pages do not appear in your Menu, even though they are included in your Menu builder on your Dashboard.
a) Check that you have changed them from Private to Public at the actual Page in question.
b) Make sure the URL is correct in your Menu builder Custom Link section.
Trap for young players: the part of the URL that comes after .com/ must have hyphens between each of the words……yes, I made that mistake.
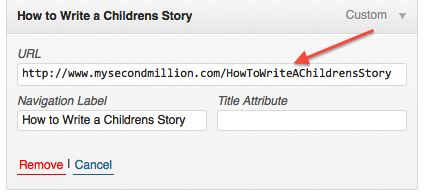
You can check your Menu entry details by clicking on the small arrow next to Custom in the main menu builder section. Then the URL link and Navigation Label become visible. You can edit any mistakes there.
Above: you see I had not included hyphens, so the link went to Not Found Page 404. Whereas the correct URL must have hyphens:
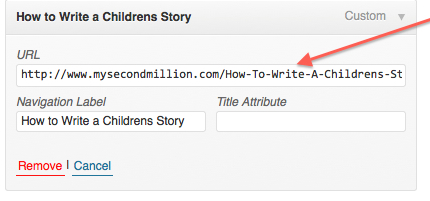 Now that link takes me where I want to go.
3. The ‘Wrong’ Menu is appearing on your Blog.
Remember that you now have 2 menus to choose from. If you have the ‘wrong’ menu showing, you can select which menu you want to be visible, by Selecting the ‘Correct’ one, in your Dashboard>Appearance>Menu screen at the ‘Primary Navigation’ drop down box.
NB. If you haven’t given your original Menu it’s own specific name, your original Menu might show up there as a blank area in the Primary Navigation dropdown. That doesn’t really matter if you only have 2 menus: one original (blank) and one Custom Menu with drop down that has it’s own name – Time Out in my case.
You can give your original Menu a name in your Menu page if you like, but you can still Select it to show on your blog, if you want to, by clicking on the Blank space in the Primary Navigation drop down.
Congratulations!
Creating your very own Drop Down Menu makes you feel really clever – which is always a good reason to do anything.
But….there is another, even more important reason to make a Drop Down Menu…. it provides you with a perfect opportunity to brag about your brilliant internet skills to the kids and other non-believers. Personal relationship advice is my final Free Bonus for today.

Pingback: Weaver II Unofficial User Guide: Menus & Info Bar
Hi Carol,
A massive thank you, for your effort and stamina in finding ut how to build these drop downs. I followed your instructions and it works like a charm.
The site is still a work in progress and it sitting on my test domain, but am loving the ride and want to give you a sincere big kudos for sharing!!
Thank you!
Rutger
Thank you Rutger! It’s a real pleasure to know that my effort was worthwhile – making your own drop down menu does make you feel really clever doesn’t it.
I never get tired of learning something new, and then making it work – and it works. I’m glad your menu worked for you.
Haha, indeed it is good feel clever at times, it pays for those moments of feeling like a bit of a drongo 😉 after doing something less clever 🙂
Take care
Rutger
Yes I do that all the time too, but I usually keep quiet about it – although I sometimes do confide in the dog.
Hi..
Thank you for making the only actual tutorial that l’ve been able to find .Other tutorials haven’a actually explained how to do things, but you did so very clearly.
Thanks.
No worries, WD. I’m glad it was useful.
You are my hero! I’ve been struggling (succeeding, but struggling) in converting a very large, old blog from TypePad to WordPress. This, thanks to you, was the only easy thing I’ve done so far LOL
Steady on, Katie! I could need a bigger hat size with talk like that!
But I do know that feeling of endless frustration – you go to ao called ‘tutorials’ and just before it gets totally incomprehensible, they always say: ‘It’s really easy, you just…%^&&%%.’ doh!
It reminds me of all my Maths teachers – you say you don’t understand something, and they explain it again…by repeating exactly what they said the first time, but louder.
Pingback: Short URL Options for Twitter: Which is Shortest? Get The Facts!
I Love it!! Took me a little time to catch on that I shouldn’t create a new menu but just create a page (totally empty) that appears on my main menu under the header and then just add custom links, as I’ve done in sidebar menus in the past,and move them in. Your explanation was a little too confusing. Or maybe I was starting at a point past that. I didn’t need to create a menu. I just needed to add custom links under the page name
Well thanks. It’s great. I have to add the rest still