 Adding Google Feedburner to your blog will set your blog on fire with the best and most popular RSS feed available, anywhere. This easy step by step guide, with screen shots, tells you exactly how to do it. RSS stands for Really Simple Syndication (Tip: remember this nugget of useful info to impress your friends with, later).
The Advantages: Why you Should Add Feedburner
1. It provides an option for your readers to subscribe to your blog, so they always know when a new post is published. This helps to keep your readers engaged with you, and your blog, and they will keep returning to read you latest riveting articles
2. The Icon is well known, highly visible, and is what readers look, for when wanting to subscribe to a blog
3. Information: it provides you with information and data about how many subscribers you have, plus other subscriber data, showing how your subscribers access and search your blog.
4. It’s never too early to start to build your list of subscribers.
5. Your subscribers will want to use a variety of different RSS readers, and with feedburner, you can give them several different RSS reader options, which gives your readers, choice.
6. It’s easy to do (no, really!) and it’s free
7. It’s part of the Google empire, so it’s always good to get inside Google’s head, keep them up to speed, and impress them with your information and data
How To Set Up Your Feedburner Account with Google
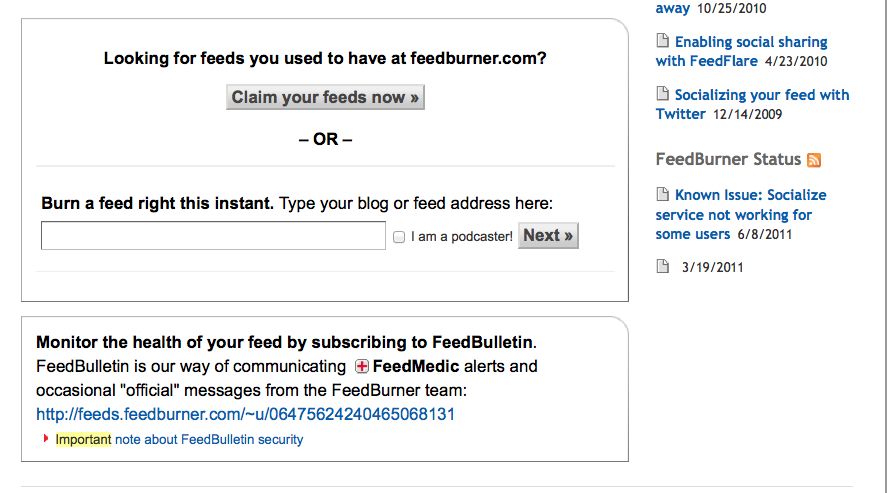
1. Go to www.feedburner.com and either sign in with your Google account, or open an account, if you don’t already have one.
You will see a screen:  2. Enter your blog or website url address with ‘slash feed’ (/feed) on the end, in the text box under the instruction ‘Burn a Feed right this instant’.
For example, the RSS feed address for this website is http://www.mysecondmillion.com/feed
Even if you don’t know where it is, almost every WordPress Theme has an RSS feed built into it, – it’s in your cPanel – the interface with your blog, supplied to you by your Web Host. But worry not, friends! There’s no need to venture into that land of acronyms and geek-dom!
Even if you’ve never seen or used your feed link before, your feed url (address) is your domain name followed by forward slash, feed e.g. ‘domain-name/feed’ (no quote marks). See the url of my RSS feed for this blog, above. That will give you the correct name of your RSS feed that Feedburner now requires.
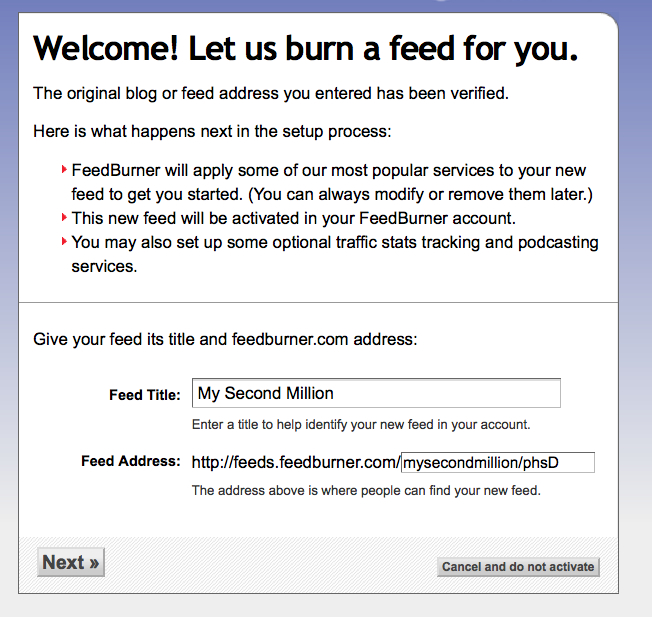
3. Click Next.
On this next screen, you will see the Feedburner ‘Welcome Message’, and the name that Feedburner will allocate for your Feedburner Account.
Check that the details are correct, and Click Next.
4. Click Next:
The next screen says, ‘Congrats! Your Feedburner feed is now live! Want to dress it up a little?’ Well of course we do! But wait!
5. First copy/paste your feed address under the Congrats message (in blue) and save a copy of it somewhere on your hard drive in case you ever need to know what it is in the future. That is the feed that people will now be using to subscribe to your blog.
6. Click Next.
Here you will see some options allowing you to select various data you might want to include in your stats that Feedburner will provide. The last option is ‘I want more!’ Too easy. Check that box. Also check the Clickthroughs box.
7. Click Next.
This screen tells you that you have successfully updated the feed for your blog. Now for the fun part:
Get Code to Add your Feedburner Feed & Icon to your blog.
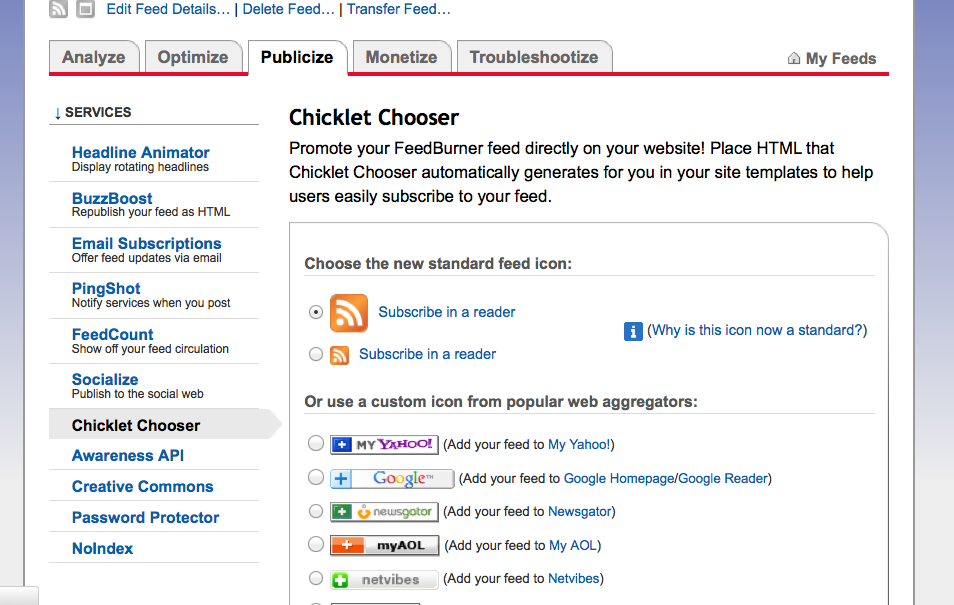
1. On your Feedburner screen, click the tab ‘Publicize’ in the menu across the top of the screen.
2. Look down the left hand side of this screen and select ‘Chicklet Chooser’.
Chicklet Chooser is the option of publishing your feed to the world, that gives your readers the option of being able to use a choice of several different RSS Readers, including Google Reader, My Yahoo, Newsgator, and My AOL etc.
3. On the Chicklet Chooser screen you now see, choose the RSS icon that you wish to display on your blog. i prefer the default icon which appears first on the list, because it’s quite large, and it’s the traditional orange RSS icon that everyone will recognise.
4. Select the Icon of Your Choice: Click, and your relevant code will appear in the window at the bottom of the screen.
6. Select and copy this code using your mouse. I recommend that you paste this Code onto a Word document as a record of your Feedburner account, in case you need it again in the future.
How To Add Feedburner Code to Your Blog
1. Log into your blog.
2. On your WordPress Dashboard, select Appearance, and then Widgets.
Widgets are used to add all the links and information that can be seen in your blog’s sidebar. Such as Categories, Recent Posts, Archives, Google Adsense spaces and many more.
For more information about using widgets to add banner ads, affiliate banners, and any of the widgets that your WordPress theme provides for you, see my article How to Add Banner Ads To Your Blog
3. On the main area of your Dashboard’s Widget screen, find the widget called ‘Text’.
4. Drag and drop this widget to the area in your sidebar where you want to place your RSS Icon.
Do this by clicking on the Text widget, keeping your mouse down, drag the widget across the Dashboard to your sidebar on the same screen, wait for WordPress to open an oblong area with perforated margins in your sidebar, and drop your Text widget inside this area.
5. Open the Text widget by clicking on the small triangle at the top right of the Text widget.
6. Paste your Feedburner code into that space, and Click Save.
Go to ‘Visit Your Site’ to check out your achievement!
And there it is! All done! Congratulations! Feedburner Systems are Go!
Pat yourself on the back. Savor the inner glow of achievement, and celebrate with your favorite reward treat. But remember, dear friends, always celebrate responsibly….within reason, of course. 
………..Cue Motto!


Thanks for sharing your thoughts on feedburner. Regards
Thanks. I remember it took me ages to work out how to instal and set up Feedburner. I don’t know why, but it all seemed so complicated. In fact, once someone shows you how it’s done, it’s not hard at all. Glad you found it useful.
Carol
With havin so much content do you ever run into any issues of plagorism or copyright violation?
My website has a lot of exclusive content I’ve either written myself or outsourced but it appears a lot of it is popping it up all over the web without my agreement. Do you know any methods to help reduce content from being stolen? I’d truly appreciate it.
Check out:
http://www.plagiarism-detect.com/
http://lorelle.wordpress.com/2006/04/10/what-do-you-do-when-someone-steals-your-content/
http://lisaangelettieblog.com/when-someone-scrapes-your-blog/
Pingback: Weaver II Unofficial User Guide: How to Customize LInks
Pingback: How to Add Nofollow Links to Blogroll, Feedburner & Sidebar Widgets
Pingback: How to Add Nofollow Links to Blogroll, Feedburner & Affiliate Widgets