 Facebook Pages are also known as Business Pages. This is because a Facebook Page is a marketing tool. A Facebook Page is not a Social site for chatting to friends. It’s very simple: Facebook Pages are a giant advertisement for whatever it is that you are trying to sell. You can chat to friends and colleagues if you want to, but the whole purpose of everything you do with a Facebook Business Page is about marketing yourself, your blog and your products.
Facebook Pages Are a Marketing Tool
Your Personal Facebook Profile on Facebook is the place where you chat to friends….I’m tempted to say, ‘It’s nothing Personal, it’s just Business!’ but I won’t. And of course you can use your Personal Profile page to invite your personal friends to visit your Business Page and get them to click the ‘Like’ icon on your Page. That’s when you know who your real friends are…. but let’s not go there – you know who you are!!
Lots of Facebook ‘LIkes’ and Comments Promote You & Your Blog
The number of Likes and Comments your Business Page receives are what impresses Google and other visitors. If you have many Likes, it shows Google and others, that people like you, like your Page, and Like what you have to offer. This tells them that you must be a great place to visit. So they click on your links back to your site, and Bingo (or equivalent) your visitor numbers surge.
If we have a blog where we want to boost visitor numbers, a Facebook Page can deliver big increases in traffic to your store, website or blog. And traffic = money in the online world.
In the article Facebook Pages for People Who Hate Facebook I give a step-by-step guide on how to create a Facebook Business Page. And the article Facebook Pages: 5 Things You Must Get Right or Fail, gives a step-by-step guide on how to choose, design and add a Cover Photo, a Profile picture (or logo), and an About section that will brand and market your blog or business.
In this article I explain How to Load up Content from your Blog Website into the Facebook Page Timeline.
How to Add a Content Post To Facebook Timeline
Tip for Young Players: do not waste your time searching for ‘How to Add a Post to Facebook Timeline’ anywhere in the Facebook Help pages. Or even the word ‘Post’. They aren’t there – nowhere, not once, nowhere. I know, because…well, never mind, we haven’t got all day…..
Here’s how to add Content to your Timeline.
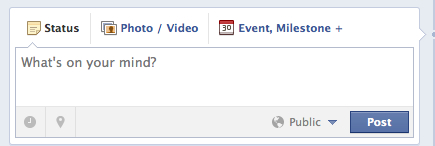
In your Page Timeline, below your Cover Photo, Profile Photo and row of Apps such as Photos and Likes, you will see a text box with heading ‘What’s on Your Mind?’. You will see Status, Photo/video, and Event Milestone across the top of the text box.
 This is one of Facebook’s clever tricks to confuse the innocent. This ‘What’s on Your Mind?’ is, in fact, where you upload the content from your blog or website into your Timeline. It’s where you make a Post.
2nd Tip for Young Players: If you ever track down the single paragraph in the Facebook Help pages that seems to be vaguely related to ‘How to Add Content to a Facebook Page’, Facebook will tell you, and I quote: ‘It’s easy. Just go to your Composer and write something’. What? Composer?? Where?
If you are silly enough to search Facebook Help pages for hours, looking for any reference at all to ‘ Composer’, you will be sadly disappointed. It isn’t there. Don’t laugh – it was a very traumatic time for me….and my family. And counselors aren’t cheap.
Also: A Post is not an ‘Event’ or a ‘Milestone’, even though your first successful one feels like a major achievement. A post is not a Post at Facebook. A Facebook Post is a ‘What’s on Your Mind’.
Adding Content To Facebook Timeline: Things You Must Get Right
1. Add a link back to your original article on your blog. This is the whole point of a Facebook Business Page – adding links to your content back at your blog. Your Facebook Page is an advertisement that is hopefully seen by a big slice of the Facebook Marketing pie:- the millions of people who are using Facebook every day.
Just copy/paste the URL from your Blog for that article and Facebook searches for it, finds it and puts it as a live link back from your Page.
2. If you want to, add a short intro for your article before you add the link. Just type it straight into the text box.
Don’t worry about the date yet, we can fix that later – see below
3. Choose your preferred Facebook Thumbnail
When you add your link, and Facebook has linked up to your blog page, you will see the title of your article, and your original article’s Meta Description. If you have an image somewhere in the original article, Facebook will choose one to display as a thumbnail.
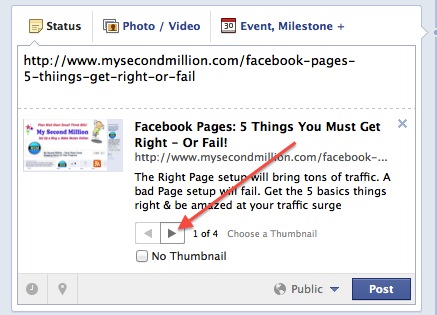
For example here is a screen shot of what a post looks like after you’ve added your URL link, after Facebook has found your article, but before Posting/uploading it into your Timeline.
Notice that in this example, Facebook chose to pick the thumbnail of my Cover Photo to display, which is not the best Thumbnail to display. But right next to it is a forward / back arrow that allows you to choose a different one from your article. In this case I can click through ‘1 of 4′ different thumbnails and select the one I choose to display. Or check the box for No Thumbnail at all if you want that.
After you click Post
(OK, it mentions ‘Post’ there, but that doesn’t count! – you can ‘post’ status updates and Comments as well – so that word ‘Post’ is not enough to tell Facebook beginners that this is where you upload content and links). But I digress….
After you click Post, Facebook loads up the links and chosen thumbnail and intro blurb if you’ve written one.
It looks like this:
Oops, this is an image of a different Facebook post, but you get the idea.
Now you will see some other things as well:
Your Facebook Page Branding logo or Profile photo
is displayed prominently in the header – great. In my case, it’s the you-beaut logo ‘MSM’ that I made. (You are allowed to take a brief moment to appreciate your brilliant logo or photo skills).
But you will also notice that next to the logo or image is a line of text that is part of your Branding. In my case, I added ‘Early Posts cover Blogging Basics and then Progress’. I added this because my blog is directly for Beginners at Blogging, so it’s useful for them to know that they should start at the earlier posts to find the things you need to know at the beginning of your blogging career.
This line of Facebook Branding text
will appear next to every new post you make. It’s another chance to use Branding to tell visitors what they will find in your Page.
To add a line of Branding Text,
click on the downward arrow next to your Page name, which appears next to your Profile image/logo.
Don’t click anything in the drop down menu that appears:
With the drop down menu showing, click somewhere in your cover photo and you get this:
Now click on the Add a Description and add a line of text.
I added Early Posts Cover Blogging Basics & Then Progress
Facebook: How to Set the Date of each Post Upload
So far: you have successfully uploaded a post via your: ‘Have Something to Say’ text box, and you see your link, text and thumbnail from your your original article. Now we need to set the date for that post to place it in the correct time on the Timeline.
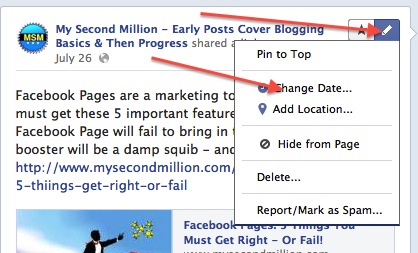
If you hover your mouse over the post, you will see a star and a pencil appears at the top right corner.
Click on the Pencil and you get a drop down menu.
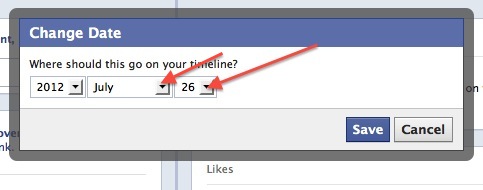
Click on Change Date.
Set the Date you want to use, click Save and the Post will get moved to that place on your Facebook Timeline.
Tips for young players:
It sometimes takes a few minutes or so to organize and display the Post in the correct place on the Timeline.
How to Highlight & Feature a Facebook Page Post?
Facebook allows you to feature one or more of your posts by Highlighting them. This means your chosenPost is displayed right across the whole width of the Timeline Page. Most people use this to make a particular post a ‘feature’ post.
You Highlight an individual post by clicking on the Star which you see next to the Editing Pencil when you hover over the post.
Alright! We’re done for today.
Free Bonus moral advice: Just like everything else in Blogging (and life), check out what other people do, decide who you respect and want to learn from, then adapt and copy what they do. Good luck, my friends.  And have fun blogging.
….Cue Motto!


Good day! Do you use Twitter? I’d like to follow you if that would be okay. I’m undoubtedly
enjoying your blog and look forward to new updates.
Hi buy hcg, OK, you got me! No Twitter yet, but it’s on my list of things to do. If you want to get notifications of all new posts, you could subscribe to the RSS Feed and get updates by email. Just click on the RSS Subscribe by Email form at the top of the right hand sidebar of every page I also always upload new posts to the My Second Million Facebook Page.
Carol
Hello, I enjoy reading through your post. I wanted to write
a little comment to support you.
Thanks florian it’s appreciated.
Brilliant! So helpful and funny!! Thank you.
Thanks Claire, sometimes humor and sarcasm is the only way to cope with traumatic experiences such as this – trying to find out how to do the really basic stuff at Facebook. Their so-called Help Pages are a nightmare.