 Setting up the Facebook Like bookmarking system on your blog is vital for Marketing and boosting your online visitor numbers. Why? Because every time someone clicks the ‘Like’ button on your blog, a message appears in the Newsfeed of all that person’s Facebook friends – with a link back to your article or blog. Yes, the Facebook Like bookmarking system is a Backlink-er’s dream.
Why You Need To Install a Social Media Plugin
Facebook Like buttons are all about Exposure. Social Media Plugins give our Blog, exposure to millions of eyeballs – I’m usually quite romantic when it comes to eyes, but this is business, right? Eyeballs are connected to brains, and brains are connected to wallets, right? Hmmm. OK, brains are only sometimes connected to wallets.  But I digress…..
For example, suppose a person has 200 Facebook friends. Now suppose that person then clicks the Like button on one of your articles. Facebook then sends a message (with that all-important link back to your article) to the Newsfeeds of all those 200 Face-bookers. That Newsfeed message tells those 200 people that their friend Likes our article enough to recommend it to them. That is exposure to a whole swag of potential new visitors to our blog.
And these ‘someone else’s Facebook friends’, are people that would otherwise not even know you, or your blog, exists. That’s a lot of free exposure to a lot of eyeballs. It’s free advertising – and that will bring many new visitors to your blog. By increasing visitor numbers to our blog, we increase what’s called ‘traffic’. And traffic = money in the online world. So, a Like but on on your blog gives you free advertising….and an opportunity to build lots of backlinks. Every serious blogger should have one.
Where Do You Get The Facebook Like Button?
Whenever you see one of those ‘Like’ buttons on a website, it’s likely that the site owner used a Plugin to put it there. It is possible to create your own Like button, and Facebook has a page where it (allegedly  ) explains how that is done, but……good luck!
It’s so much easier to find a plugin made be some clever-clogs geek, and install a Like button in a few clicks of your mouse.
So, how to find a Social plugin for the Like button? Naturally, I’ve done all the hard work so you don’t have to…. …Follow me, team!
Choose The Best Social Plugin
There are lots of Social plugins you can use to install a Like button on your website. I think that the Socialize Plugin is the best one. Why? Because it has a few you-beaut extras that allow us to customize how our Social plugins appear on our blog. Most of the many available Social plugins include buttons for other social networking sites as well. For example buttons for Twitter, Linkedin, Stumblupon and others. The Socialize plugin includes all these options too.
All these other social media network buttons work in the same way as the Facebook Like button: they bring social media traffic back to your blog. Now, we need to install and activate the Socialize plugin.
Step by Step Installation of Socialize ‘Like’ Plugin
We install the Socialize plugin in the same way we make babies….in the usual way.  Oh no, it’s one of those days again – settle down Carol! OK, will do.
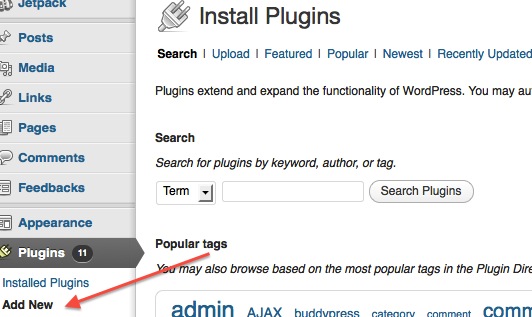
Go to your WordPress Dashboard. Click on Plugins>Add New.
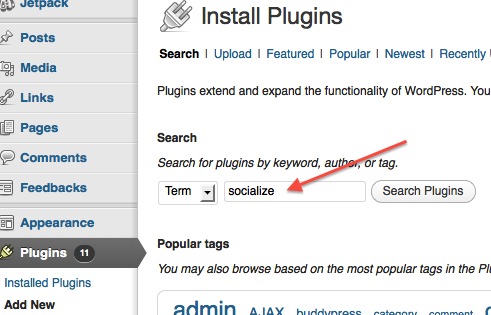
In the text box next to Search Plugins, type Socialize
Click Search and you will see:
Click on Install Now: and then you will see Successfully installed.
Alright! We’re in business.
How to Activate Plugins
Once again, we do it in the usual way. Click on the ‘Activate Plugin‘ you can see in the above screenshot. Now we need to Configure our new Socialize plugin.
How to Configure the Socialize Plugin
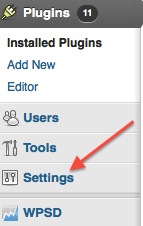
On your Dashboard go to Settings at the bottom of the left hand side, and click on it.
and look for Socialize in the list, and you will see this:
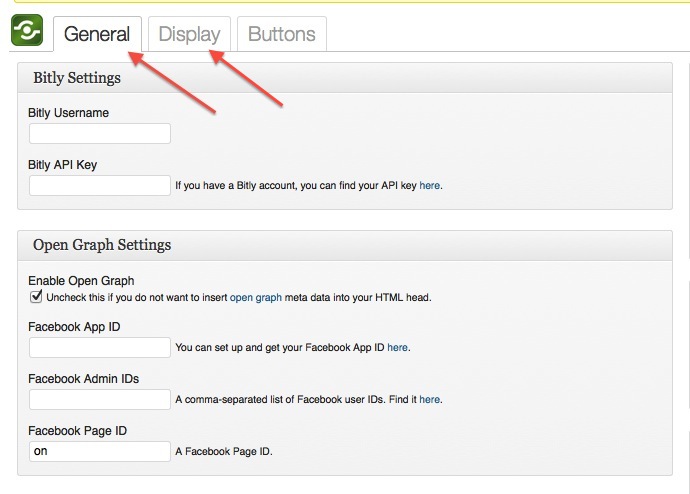
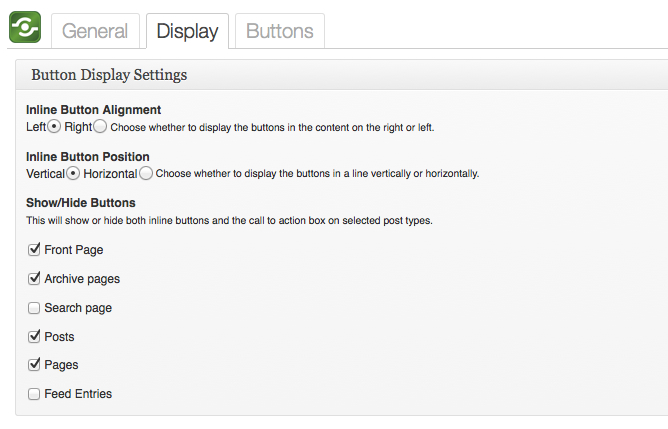
Look at the top of the screen and you will see you are now looking at the ‘General’ page of the Socialize plugin set up. Ignore that for now, and click on the Display tab that’s next to the ‘General’ tab
And you see this screen with the default settings.
Here is where we can customize and choose where we want our social media icons to be placed on our posts and pages. I like mine to be on the right hand side, and in a vertical line. The default placement is vertical and on the left. Choose the orientations that you want by clicking on the options that you want.
Below that you can choose where on your site, the buttons will be shown or hidden.
I like to un-check (hide) the social plugin icons on Archives, Search, and Front Page and just make the Socialize buttons visible on Posts and Pages. Select or deselect the options that you want for your blog.
Next down on the Socialize Display Settings screen, we come to the settings for the Call to Action Box. A Call to Action Box is exactly what it says: it’s an enclosed area of text where you ask your readers to actually do something for you. 
How to Configure the Socialize Call to Action Box
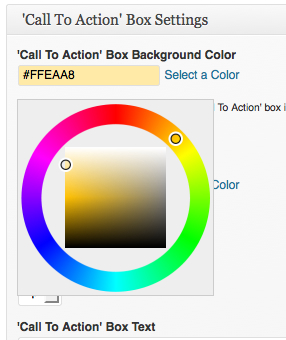
The first option at the top lets you select the background colour of your Call to Action Box
The default color has the HTML code #FFEAA8 which is the yellow you see. That color doesn’t suit my blog’s color scheme, so I want to change it. I clicked on Select a Color. I finally chose #f0fbfe by clicking a combination the circle and square area color selectors. You can choose any color that you think looks ok on your blog.
I don’t think you will need to change any of the borders and other design feature tweaks you change here. But you can if you want to.
Now we come to the interesting part.  Buckle up and prepare for incoming…..
The Socialize Plugin ‘Call to Action’ Box Text
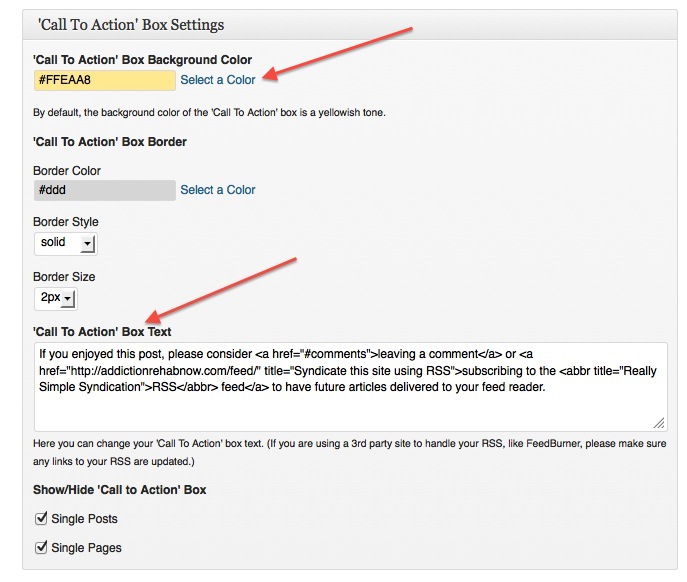
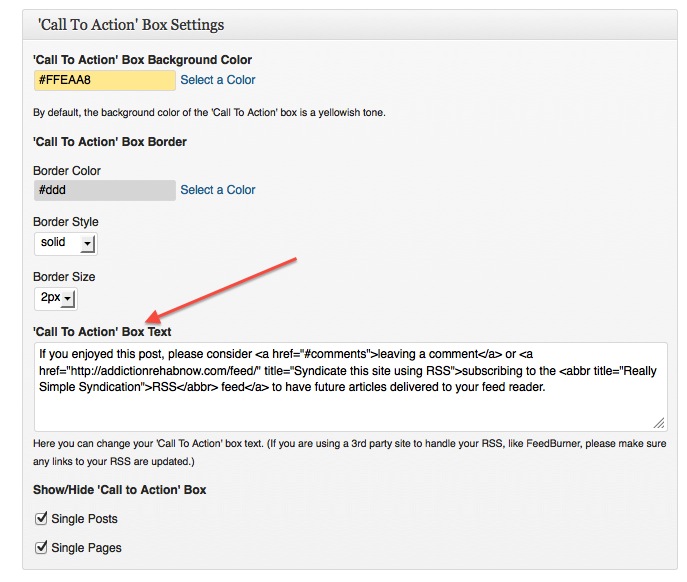
This is what appeared when I did a fresh Socialize plugin install on my other blog, Addiction Rehab Now. It shows the default text you will see before you configure this text box – the red arrow in this screen shot below.
It says:
“If you enjoyed this post, please consider <a href=”#comments”>leaving a comment</a> or <a href=”http://addictionrehabnow.com/feed/” title=”Syndicate this site using RSS”>subscribing to the <abbr title=”Really Simple Syndication”>RSS</abbr> feed</a> to have future articles delivered to your feed reader”.
My color coding formatting above shows:
- Bold: the default text that will appear on your site.
- Red: the default RSS feed address for the blog – in this case for my other blog Addiction Rehab Now
- Green: the HTML code for the social network buttons and feed links. Don’t change any part of this code.
The default Socialize Plugin settings have automatically inserted the blog’s default WordPress RSS feed URL as the RSS feed link to use. That’s fine if we are only using the default WordPress RSS feed that comes automatically with your WordPress software.
But if you have installed the more sophisticated and useful Feedburner RSS feed for your blog, you are going to have to change that RSS URL address.
As an example, here is how I configured this ‘Call to Action’ Text box for My Second Million:
“If you enjoyed this post, please click the Like button on the Left. And consider <a href=“http://feeds.feedburner.com/MySecondMillion“ title=”Syndicate this site using RSS”>subscribing to the <abbr title=”Really Simple Syndication”>RSS</abbr> feed</a> to have future articles delivered to your feed reader”.
My color coding formatting is the same as before, but this time I’ve changed:
- the text that’s visible on the site (bold),
- the Feedburner RSS url address that I found and inserted in place of the WordPress default RSS url address (red).
So we need to know how and where to find our RSS Feedburner address.
How to Find Your Feedburner RSS Address
1. Easy way: Right click on your already installed Feedburner RSS icon. Left click on ‘Copy Link Location’ – or some platforms say ‘Copy Link Address’ – go to a Word document to save it for future reference, and right click/paste. You will see ‘http://feeds.feedburner.com/…….’ and where you see the dots there after the slash, will be the Name of your Blog. For this blog, My Second Million, the feed address is
http://feeds.feedburner.com/MySecondMillion
2. Even easier way: just write http://feeds.feedburner.com/ and add your blog name (no spaces) after the forward slash.
All you have to do is delete the default feed URL in the default Socialize Text Box, and copy/paste your own Feedburner address in it’s place. You must make sure that there’s still the quotation marks “ before and also after the URL.
Alright. Scroll down and click Save Changes.
Phew! Only one more job to do.
How to Configure the Socialize Plugin Buttons
Go to the top of the screen and click on the third tab: Buttons.
This is easy. Check the boxes for the Icon buttons you want to display on your site. The left hand group of check boxes is for the icon buttons that appear at the top of your articles. The right hand set of icon buttons is for the icon buttons you display in the Text Box that appears at the end of your articles.
Below that are various formatting options for each selected icon buttons. I didn’t change anything. Scroll down, click Save Changes. Visit your site and admire your handiwork. Not bad eh? Coolio. Time for some chips!



Thanks for this awesome write-up about socialize. I’m almost done with the next version which expands upon the recently developed API. To promote the new features I’m creating some templates that tweak the output of Socialize to accomplish different looks and functionality. So far I’ve got a floating share bar ready to go and I’m hoping to have a few others done soon so I can launch. You can follow along with development on GitHub (https://github.com/jonbish/socialize).
Thanks again!
Hey! Listen up everyone….this is the Big Cheese of the Socialize Plugin himself! – the clever-clogs geek who created this plugin. Welcome, Jon!
And thanks for your you-beaut Socialize plugin. I do really think it’s the best social plugin I’ve seen….and it works too. 🙂 Most plugins have bugs occasionally, but I’ve never had any problems with yours.
I’ll definitely be keeping an eye out for your upgrades.
Carol.
I was very happy to discover this web site.
I need to to thank you for your time just for this
wonderful read!! I definitely loved every little bit of it and
i also have you bookmarked to look at new things on your website.
Thanks Lenore, it’s appreciated.
Pingback: Weaver II Unofficial User Guide: How to Customize LInks
Great article…I just have a problem. I’m working in local and with all plugins to socialize my blog facebook like button doesn’t appear even if the css code exists. Can you help me to understand why? Thanks a lot!
Hi Maria, I use the Socialize plugin to add social networking icons. No CSS required, just install the plugin and in the plugin settings, select which buttons you want, and where to put them. If that isn’t working for you, maybe you could contact the plugin makers? Sorry I can’t be more help.