Weaver II Header area customizations control more than just the image you choose to upload to you blog. Whenever you include any Code, or instructions, or plugins, into the Header section of a website, they are applied (top down) to the whole of the blog – Unless you add other instructions that exclude this from happening on specific areas inside your blog. We don’t need to worry about that now, but bear this web structure in mind, when setting up a website and theme.
For example, the Header section of any Theme is the preferred location of such things as your Google Analytics code. That is because you want the Analytics data collecting Plugin to apply to your whole blog – not just specific pages inside your blog.
Reminder: Your Analytics Code is your personal Code you get from Google Analytics when you sign up for free Google Analytics account. There are plugins that can be used to add your Analytics Link code into your Header area, or you can do it in your Weaver Admin panel. But we don’t need to worry about that when setting up the Header section in Weaver.
Beginner Tip: If you want to see what any site has included in it’s Header area (or anywhere else), just right click inside any web page and select ‘View Page Source’ from the drop down menu. That will allow you to see a complete HTML version of any page on any site, and is a good way to start to ‘read’ HTML if you don’t know your </script> from your elbow.
As a complete beginner at HTML, I started off by right-clicking and selecting ‘View Page Source’, and using my Edit>Find option in Microsoft Word to find words like ‘theme’, or ‘wp’ or ‘Header’ or ‘keywords’, or ‘meta’, which are all buried somewhere in that sea of….hmm…mumbo jumbo?  Or, I tried to spot the ‘UA’ code section of their Analytics plugin, just to see where it occurs in a page’s HTML. This is a good way of starting to familiarize yourself with the language and layout of the HTML version of a web page, and to check out the themes, color schemes, plugins and keywords that other websites use.
But…we don’t need to know anything about any of that to use Weaver, or to customize our Weaver Header Section. 
Location of Header Settings In Weaver II Admin Options
The Header settings are found at Dashboard>Appearance>Weaver II Admin>Main Options>Header:
If you click on that yellow question mark on the above screen shot, you will be taken to Weaver’s Help pages dealing with the Header. I won’t include all of the Help info here, but this is an extract from the Weaver Help section on Header.
“You also have several options for controlling basic display of the Site Title and Description (set in the dashboard Settings->General panel). If these settings don’t give exactly what you want, the very best way to get exactly what you want is to use a photo or image editor to add exactly the site logo or title you want – you can simply hide the default display of the site title and description in that case.
Weaver II supports the variable sized header images included beginning with WordPress 3.4. You can also check “Hide Header Image” to hide it. The header image will always be displayed using the site’s full width. The default is 940px width by 188px high. You can also control how much space is displayed after the header and before the content”.
There is another secondary Header admin area in Weaver, where you can upload one of Weaver’s stock Header Images that comes with the Weaver Theme, or upload your own image, or choose to have no image at all. I’ll cover that section after we’ve done this Main Header Admin Area Settings.
Customizing Main Header Settings in Weaver II Admin Panel
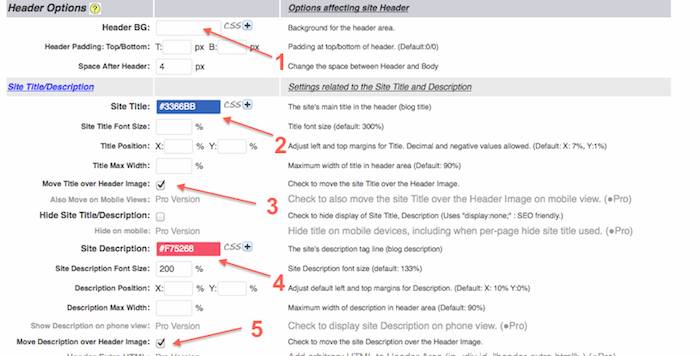
Example 1: Suppose you want to use a header image which is pale in color and does not have any Title Text already added onto it yet. For example, one of the Weaver Header Images that are included with the Free Weaver II theme.
These are the Header settings you might use:
No 1: no need for a background color because you are using a Header image to fill the Header area. You would only need to add a color at No1 if you wanted no Header image, and intended to just have Title Text and Description against a colored background.
In the case of using a pale colored Header Image, your Title Text could be Blue (No 2), your Description Text could be Red (No 4), and if you wanted your Title Text and Description to be moved onto/into the Header image itself, you would check the check boxes at No 3 and No 5 which do that job for you.. See how easy it is? Would I lie to you? Correct answer: NO!
[Free Bonus Tip: If you want a specific answer to a question, it can help if you tell people the correct answer first. That works for me…mostly.  ]
]
Example 2: if you wanted to upload your own Header Image with the Blog Title and Description already included in your Header Image (like I have here on My Second Million), you would still leave the background color (No1) blank (assuming your Header Image will fill the Header Area Space).
In this second example, you would also leave the Site Description color picker (No 4) blank, and you would un-check the check boxes at No 3: Move Title over Header image, and at No 5 Move Description over Header Image (because we don’t need them).
In this second example, you would Check the check box for Hide Header Title and Description located between numbers 3 and 4 in the above screenshot. You would check that check box because you do not want to use the Weaver Title Text and Description Text options because you have organized that already in the Header Image you are going to upload.
If you want to know how to make your own Logos and Banners on a Mac, see How to Make Free Logos Using iPhoto and Mac Preview. And maybe also How to Shrink & Resize Images Using iPhoto and Mac Preview.
Not much more to do now……
How To Set Or Change The Weaver II Header Image Height.
The Standard height of the Header image area of your Weaver II installation is 188 pixels. If you upload one of Weaver’s own Header images, it will fit exactly into the default Header area height of 188 px.. I have chosen to use a less high header image. Why? It’s important for SEO reasons to have as much Content (and your most important widgets) visible in the browser screen when someone first arrives at your blog. This area that is seen without scrolling down the page, is called Above the Fold.
[This phrase comes from the world of newspapers, which are traditionally displayed in racks that only show the top half of the Newspaper’s front page. We want the tops of our web pages to be interesting, so our visitors stay to check us out, not click away immediately, because all they see are lots of ads and dollar signs].
So, if you have a relatively thin Header Image at the top of your page, more of your important content is visible ‘above the fold’. You can see how to manipulate image sizes in How to Resize & Shrink Images Using iPhoto & Mac Preview App. And you can see how to add text to images at How to Make Free Logos using Mac Preview App.
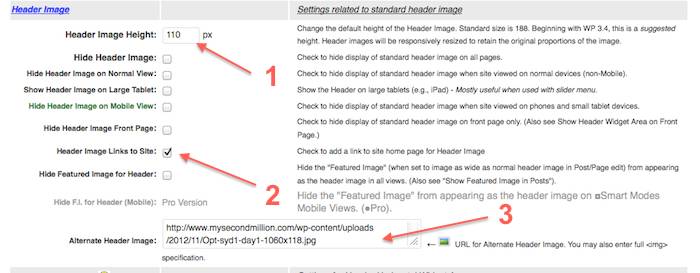
Here is how I have my own Header Image Settings for this Website:
No 1: I have the image height set to 110 px, not the Standard height of 188 px.
No 2: I have checked the check box that says:
| Header Image Links to Site: | Check to add a link to site home page for Header Image |
|---|
That means that if someone clicks on that image, they get taken to My Second Million. Which sounds odd, because they would already be here, but whatever…. I checked it anyway. It seemed like a good idea at the time….and it’s free. 
No 3: Here is where you upload your own image from your computer. It’s the usual method of Browse, locate your image in your computer files, click upload….and Hey presto! It works like magic. Easy as….
All right! There are a lot of other Header options available in Weaver II to do clever things with your Header area, but I am currently not using any of them. These settings above, are all the options you need to get your Header area up and running and looking how you want it. You can investigate the use of Header Widgets and other fancy Header options in your own time…….also, I’m not entirely sure how to use them myself yet. 
The only other thing to cover in this Header Section Guide is the secondary Header Admin area I mentioned at the start of this article. This 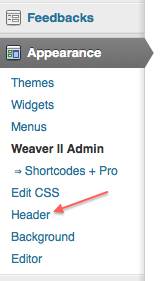 extra Header admin area is found at Dashboard>Appearance>Header on the left sidebar of your Dashboard screen.
Here is where you can select to use one of Weaver’s own Header Images that come with your Weaver II Theme.
And here is where you can choose to Remove Header Image (if you already have one, and want to get rid of it).
And you can choose to Restore a Header Image if you want to go back to having a Header Image that you previously uploaded.
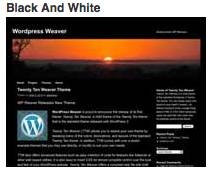
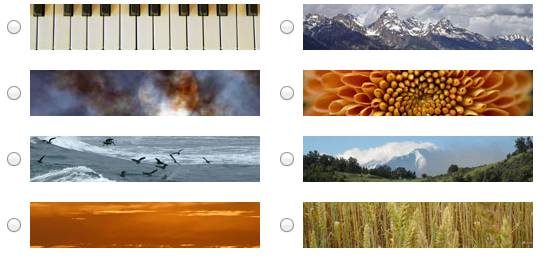
Here are thumbnails of the Header Images that are shipped with Weaver II free version.
You will see there are check buttons to the right of each image. If you want to use any of these images, you just check the relevant button, and Save Settings. It couldn’t be simpler.
Wow! What a marathon article that was! I think I’m too exhausted to even reward myself with some well-earned chips…I know, it ‘s hard to believe, isn’t it. Maybe a nice cuppa will restore me to my former self. Meanwhile…..
Why not Subscribe to our Newsletter by clicking the Subscribe to Our Newsletter tab below. And check your Spam Folder if you don’t get a confirmation email within a couple of minutes of Subscribing.


Pingback: Weaver II Theme: Unofficial User Guide: Index & Links