Customizing how our individual Blog Posts look online is a major design opportunity. Some bloggers like the brightly colored, all-the-bells-and-whistles, sort of Blog Posts. I prefer a more sedate approach…I like to think of it as more refined… But anyway, the ‘look’ of our Blog Posts on the screen, is important for everyone – all bloggers, and all readers. The good news for bloggers is that the Weaver II WordPress Theme is perfect for all tastes and all skill levels. Why?
Because you can set up a really nice looking website, and make it just the way you like it without any design skills. You don’t even need to know any CSS (website design language) or HTML Code. With Weaver, you can customize everything using only a computer, a website and a mouse.
This article takes you inside the Weaver II Theme Admin Panel so you can see how it all works before you commit to using Weaver as your WordPress Theme, or afterwards if you need a bit of extra guidance.
I’m afraid this article is going to be yet another marathon event. That’s because I want to explain everything in detail, and not skip over those little traps for young players we all know and love…oops…. know and hate.
How to Customize Weaver II Admin: Post Specifics
You find Weaver’s Post Specifics Option Panel at Dashboard>Appearance>Weaver Admin>Main Options (No1)>Post Specifics (No2).
But what are Post Specifics? Here’s how Weaver describes them:
“Options related to Posts, including Background color, Columns displayed on blog pages, Title options, Navigation to earlier and later posts, the post Info Lines, Excerpts, and Featured Image handling”.
If you click on that yellow Question Mark, labelled (No 3 in the above screenshot), you are taken to the relevant Weaver Theme Help Pages. These yellow question marks occur in many places throughout Weaver II Admin Options. They always take you to the relevant section of the Weaver Help Pages for that particular option setting.
OK, the first option to customize in Weaver Admin>Main Options>Post Specifics is……Post Page Specifics. Uh?  That’s because this whole Post Specific section of Weaver Admin options customizes Blog Posts, whether they are viewed in the short-form Blog Posts on the blog Home Page, or as the same Post, viewed as a full, single-Page, Post. A Post is always a Post, even when viewed as a single Page. See? Easy as!
In WordPress, there are 2 types of written Content: Posts and Pages. Examples of WordPress Pages are the static WordPress Pages, such as the About Page or the Contact Page. You write the content for a WordPress Page in Dashboard>Pages>Add New.
Posts are the content you write in the Post section of WordPress, at Dashboard>Posts>Add New, and are normally uploaded to your Blog Home Page.
1. How To Customize Weaver II Admin: Post Page Specifics.
Post Page Specifics: The layout and how you make choices in this section of Weaver Admin Options are consistent throughout Weaver Admin as is explained in previous User Guide Articles: you control everything with Check boxes, and Color Pickers plus Custom CSS Styling – for those of you who want to, and who can.
But you don’t need to know any CSS (website design language) to design your Blog with the Weaver II Theme.
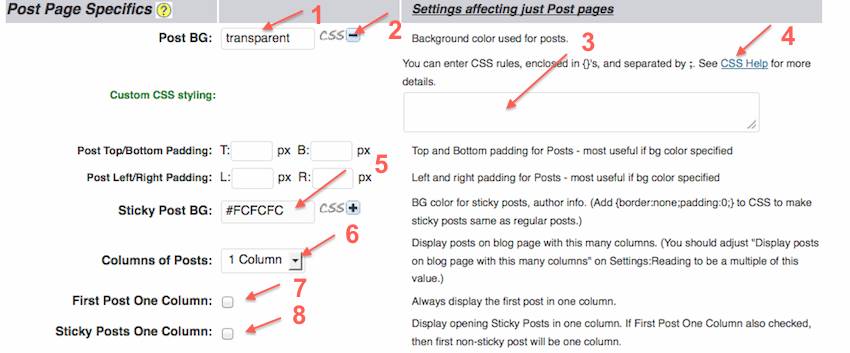
A: Post Background: (No1) Here is what the Weaver Help Pages say about this option:
 I have chosen to not add any custom CSS into the CSS styling box, No 3 in screen shot above. Weaver Help tells you above what CSS to add if you want to change the font color or add a border, if that is what you want to do.
I have left the Post background color as the default Transparent setting for this option. A Transparent setting means that the color of the ‘layer’ below this particular one, will show through.
In my case, the layer ‘below’ my Posts is my Default background color setting that I selected in my Weaver Admin>Major Options>General Appearance section of the Weaver Admin Panel (#FCFCFC off-white).
I wanted my Post background color to be the same as elsewhere on my blog, so I didn’t have to select it again here – so I just let it show through by leaving this option as Transparent.
If you want to, you could select a different background color for your Posts with this option here at Main Options>Page Specifics>Post Page Specifics>Post Background Color.
CSS +/- : No 2. this is the (by now) familiar option where you can click on the + sign a a Custom CSS Styling text box opens up (No 3).
That CSS Styling text box is where you can add your own design CSS instructions, if you want to, and if you can. CSS stands for Cascading Style Sheet – a webdesign language. With the Weaver Theme you do not need to know any CSS (or HTML) to set up and design your websites.
If you want to learn a bit about CSS, that CSS Link (No 4 in the screenshot above), takes you to the Weaver CSS Help pages.
The next options down the Post Page Specifics is:
B: Post Top Bottom Padding: (not numbered in above screenshot) and
C: Post Left Right Padding: (also not numbered) : Padding refers to the spaces around the written Content of your Blog Posts. I have left these blank, which means I am using the Weaver default settings.
If you want to increase the blank spaces around your Content (top/bottom or left/right), add numbers (in pixels) into these text boxes. The best way to see how any particular number of pixels translates into spaces on the page, is by trial and error.
Maybe add 5 pixels first, and see how that looks. If you want more space, try 10 pixels and check how that looks.
D: Sticky Post Background Color: (No 5 in screenshot above). I have selected my standard off-white background color here (#FCFCFC) so any sticky posts will have the same background color as all other posts.
If you want to change the ‘look’ of a Sticky Post by selecting a different Background color for it, this Option is where you would do it.
E: Columns of Posts: (No 6 in the above screenshot).
I have selected to use a single column for my Blog posts, but other choices with this Weaver option are: 2 Column and 3 Column Posts. You just click on the drop down menu at this Option and select the number of columns you want to have. The best way to see how these options work is to try them out and see how they look for your blog.
F: First Post One Column: (No 7 in screenshot above): I have not customized this option (blank) because I didn’t need to. I had already chosen to have all my posts as single column posts, so this First Post One Column option is not needed (by me).
This option could be used if you had selected either 2 Column or 3 Column Post layout at E: Columns of Posts: (No 6) and yet you wanted your first post on your blog to be a single column post.
G: Sticky Post One Column: (No 8 in screenshot above). You only need to check this Checkbox if you have selected either 2 or 3 Column Post layout in No 6, and not checked First Post One Column at No 7.
If you already checked the First Post One Column option at No 7, your First Sticky Post will already be selected/customized to be a Single Column Post.
2. How to Customize Weaver II Admin: Post Title Area
Post Title Area:
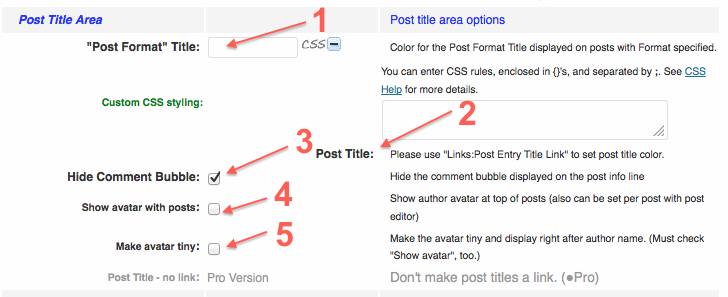
A. “Post Format” Title: (No 1) – this option does not customize your ordinary (Standard) Blog Post Titles. This option here, specifically controls the color of the Titles of Posts you choose to be uploaded in one of the Non-Standard Formats.
What Is a WordPress Post Format?
They are the different styles of Post Formats you can select here:
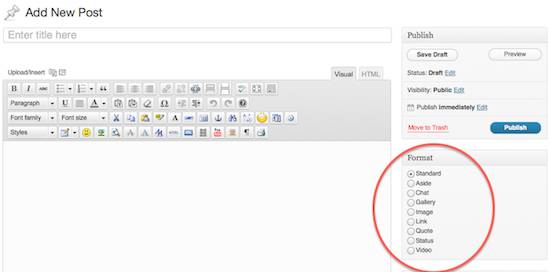 Post Formats were introduced with WordPress version 3.1. Not all Themes offer this Post Format option. But good news! Weaver does. The best way to see how each of these options works with Posts is to try them out:
Write some content on a New Post, select a Format, and press Preview to see the effect. Try them all to see how they work.
So if you choose to use any of these Post Formats, the Title of those Non Standard Posts is selected here at this option.
Important:
You do not customize your Standard, normal, ordinary Blog Post Titles here in this Post Specific area of Weaver Admin.(No 2 in screenshot) Ordinary Blog Post Titles are customized in Dashboard>Appearance>Weaver Admin>Links. Why?
Because a Standard ordinary Post Title is also a LINK to the full page, single-page version of itself. Therefore a Standard Post Title is technically a Link, and therefore customized in the Links section of Weaver Admin.
B: Hide Comment Bubble: (No 3) I have this box checked so the Comment Bubble is hidden. Test this feature to see what it looks like, and then select or hide accordingly.
C: Show Avatar with Posts (No 4) I have this unchecked because I am the only author at this blog, and didn’t think that having my mug-shot all over the place next to every post, added anything of value.
D: Make Avatar Tiny (No 5) this option applies to the Avatar next to the author, not the Avatar of people who comment on your blog. This Make Avatar Tiny option only applies if you have already allowed Author Avatars at C: Show Avatar with Posts (No 4).
3. How to Customize Weaver II Admin: Post Specifics: Post Navigation
Post Navigation:
A. Blog Navigation Style: (No 1) This option controls the style (the text) of post navigation, not the order in which blog posts are arranged on your blog.
Example: Suppose you choose to have 5 Short Excerpt Posts scrollable and visible on a single screen of your Home Page Posts. That setting divides up your Posts into different Pages of Home Page Posts – 5 Posts to a ‘Page’ of your Home Page Posts.
This option controls the text that is visible when you view the bottom of your Home Page showing your latest Posts. And also bottom and the top and of older ‘Pages’ of Home Page Posts.
I have Older/Newer Selected. That looks like this:
 Weaver Choices available are: Older/Newer Posts, Previous/Next Post, or by Page Numbers (Paged – Left, and Paged – Right)
B. HIde Top: (No 2) If you check this check box, the navigation Older Newer, or whichever style you selected at No1, is hidden at the top of your Home Page Pages.
C. Hide Bottom:(No 3) If you check this checkbox, the navigation Older/Newer, or whichever style you selected at No1, is hidden at the bottom of your Home Page Pages.
D. Show on top of First Page: (No 4) checking this check box allows you to show the Older navigation link (not newer because there aren’t any on your First Page.
Unless you check this check box, the first Home Page screen will not show an Older Posts navigation link at the top of the first Home page, even if you did not hide (you allowed) top navigation links at No 2.
E. Single Page Navigation Style (No 5) This option controls the text chosen for navigation links when reading a Blog Post, when viewed as a single Page.
The Weaver choices are: Post Titles (my choice), Previous/Next or None displayed.
Weaver Post Titles navigation links look like this at the foot of a Post viewed as a single Page:
The appearance at the top of a Post when viewed as a single Page, is similar.
F. Link to Same Categories: (No 6) if you check this check box, your Post Navigation Links (when viewing a single page version of a Post) are restricted to other Posts within the same category of the Post you are reading.
This means that if you have 2 consecutive posts that you have allocated to different Categories, the Post Titles at the top and/or bottom on the page will not follow strict Date Published order, as they normally do.
They skip the previous Post(s) if the Previous Post belongs in a different Category, and shows links to the Previous/Next Posts that belongs within the same Category as the Post you are currently viewing.
G. Hide Top: (No 7): this is similar to the option B. (No 2) above, except that this option Hides the Post Navigation Links at the top of individual Posts when viewed as a single Page.
Whereas Option B. (No 2 above) hid the Navigation Links at the top of collections of Posts (say 5 Individual Posts) that can be viewed on a single Home Page screen.
H. Hide Bottom: (No 8) This option controls the same navigation links as at G. (No 7) above, except this option hides the Navigation Links at the bottom of Posts when viewed as a single Page.
The next section of Weaver II Admin>Main Options>Post Page Specifics is:
4. How to Customize Weaver II Admin: Post Meta Info Areas
Good News! I’ve already written a complete article explaining all about Post Meta Info Areas: what they are, and how to customize them in Weaver Admin. Here’s the link: Weaver II Theme: Controlling Post Meta Info Areas.
5. How to Customize Weaver II Admin: Excerpts
Excerpts:
 A. Excerpt Blog Posts (No 1) checking this check box changes the way your Posts are displayed on your Home Page Pages. Your Posts are all displayed as very short excerpts but still with only your specified number of Posts per Home Page Page.
The default setting displays only the first 40 words of each post. No images are displayed unless you have specifically added an image as a Featured Image.
This option over-rides the manually set <–more–> page break setting.
B. Full Post for Archives (No 2): checking this check box makes ‘special’ post pages, such as Archives, Categories etc remain full Page Post display, even when you have selected Excerpts at No 1 for your Home Page Pages.
However, this option does not over-ride any <–more–> page breaks you might have already specified for your ordinary Home Page Posts.
C. Full Posts for Searches (No 3) this is a similar option to No 2 except it controls the display of Search Pages, not Archive Pages.
Again, this option does not over-ride any <–more–> page breaks you might have already specified for your ordinary Home Page Posts.
D: Excerpt Length (No 4) Here you can change the number of words displayed in your Excerpts. The default number is 40 words.
Obviously this option only applies if you have chosen to check Excerpt Blog Posts at No 1.
E. Continue Reading Message (No 5) Here you can change the default message with some similar message. If you want to, and if you can, you can include HTML (e,g. <img>).
6. How to Customize Weaver II Admin: Featured Images
Featured Images:
Not all themes offer this Featured Image Customization, but Weaver II does.
There are 2 ways to add Images to Posts and Pages in WordPress: using Upload Image with its icon at the top of every Edit Page, and Set Featured Image which is found at the foot of the right hand sidebar of the Edit Page.
Mostly you will be uploading images using the ordinary Upload Image option. The Set Featured Image option is particularly useful if you have a magazine type of layout. This section offers several ways to customize Featured Images, if you are using them.
Here is what the Weaver Help Pages say about Featured Images:
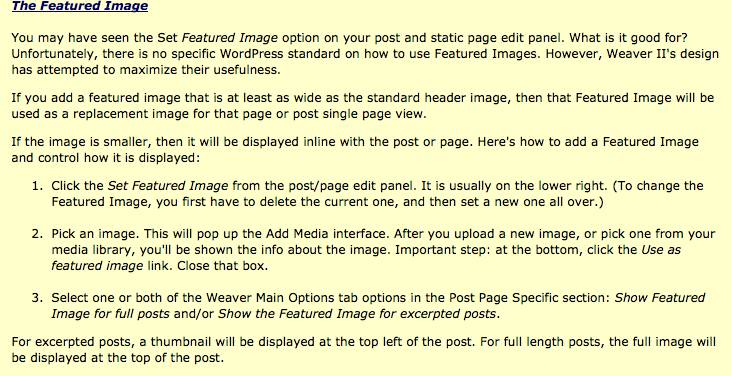 I do not use the Featured Image upload feature. But I have still set my Featured Image Size for a Blog Post (No 1) as Medium, and Featured Image Size for Posts when viewed as a Single Page (No 2) as Medium….because… it must have seemed like a good idea at the time.
WordPress Codex (Information Pages) gives the default WordPress dimensions for images in WordPress Themes as:
Last but not least in Post Page Specifics is Other Post Related Options:
7. How to Customize Weaver II Admin: Other Post Related Options
Other Post Options:
A. Show Comments are Closed (No 1) checking this check box displays the text ‘Comments are Closed’, but Comments have to be ‘off’ and no Comments have already been made.
B. Hide Author Bio (No 2) I have this check box checked because you all know the author is me, and I don’t want to clutter the screen with extra ‘stuff’.
This option hides Author Bio on Author Pages and Posts when viewed as a Single Page.
C. Allow Comments for Attachments: (No 3) Checking this Check box allows visitors to leave Comments for Attachments – usually a full size media image, but only if Comments have been allowed.
Alright! Finally! All done and dusted for this article. And I managed to keep it under 3000 words! Yes. Another Marathon post is in the can.
Only one more to go, and that will be Footer Options. That is a much smaller section, thankfully.
Why not subscribe to our Newsletter and get an email every time a new Post is Published… and special offers – my next project after this User Guide. It’s easy and it’s free.  Just click on the Red Subscribe Button below:




Pingback: Weaver II Theme: Unofficial User Guide: Index & Links
I just discovered your site.
I use Weaver II myself and was unable to customise my site to my satisfaction. I tried reading those wordpress blogs and Weaver-II site, but could proceed only a little way. Your blogs look like gems to me. I have just started reading. Hope this would help me rejuvenate my own website.
Thanks a lot.
Hi Soumen,I hope it does too. It always takes a while to get to know any theme, but it ia true that many of the online guides are limited, and difficult to follow.
I haven’t really done anything fancy with this blog – it’s pretty much just the basics, and learning as I go.
Good Luck!
Do you know how to limit the number of posts per page?
Thanks!
Hi Becky, yes that is a WordPress Setting – you do that from the WordPress Dashboard. Go to Dashboard>Settings>Reading and near the top you will see the check boxes where you can nominate how many Posts appear on each page.
Hi there,
I want the featured image on the full post page to click open to a larger image, but I cannot find out how to do this; it happens when the image is inserted into the post, but not when it it a featured image. Is it possible?
Thanks
Sue
Hi Sue, sorry to say I don’t know. I always use the WordPress ‘Add Media’ method for adding images, not the ‘Featured Image’ method. I’ve always been a bit confused about what the Featured Image method does that is different to the Add Media method.
And I’ve never needed to be able to click on an image so it enlarges when you click on it.
After I’ve added my images, you can click on them and they then show up in their own window in a single screen, but the size is the same.
Thanks anyway Carol
Sue
Hi Sue, I checked out your site and you are already doing it as far as I see. You have the smaller thumbnail for the blog page excerpt, and when I click on it, the pic is much bigger when on it’s own single page for that article.
I thought that is what you wanted to do? Oh well, I got the wrong end of the stick again!
In multiple searches for “Weaver Post Formats”, your site ranks higher than Weaver itself! The reason I am searching (and possibly a good blog topic) – how did you create your “privacy policy” page in Weaver II?
1- What I am wanting. A “privacy policy” link in my footer, that can be clicked on and taken to a Page (not a menu item).
2- I tried adding a post as a draft post format of ‘aside’, ‘link’, etc, and turning off sidebar, post title, comment bubble, etc. at the bottom.
3) The PROBLEM – I can’t get the Navigation/breadcrumbs to NOT show. Also, Weaver wants to categorize this as a “uncategorized”.
please help – There is NO documentation on Weaver’s site how to do this, but you have yours set up beautifully.
Thanks.
Tina
OK Tina, I’ll look into how I made my Privacy Policy and your breadcrumbs issue and get back to you. I do remember that doing the Privacy Policy was a bit of a challenge!
Hey – thanks for commenting back.
And I figured it out, so please don’t bother. I had read (somewhere) about making a post but never posting it for things of this nature — that leaves breadcrumbs.
So instead, I made a page and used the Weaver controls at the bottom of the page to turn it off from the menu, etc.
And seriously – thanks so much for responding. I appreciate it.
Tina
Glad you got it sorted out tina.