 Designing graphics, text boxes and online forms! What a nightmare! Should you hire a professional designer, and blow hundreds of dollars? No way! Not unless you have money to burn!
Should you struggle with Design Form Template Plugins that take you hours to learn how to to use….and are never exactly what you need? No!
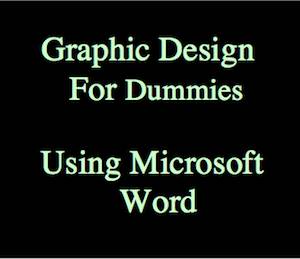
Follow these simple step by step instructions. They tell you exactly how you can design your own Graphics using ordinary Microsoft Word plus Screenshots. Just like the graphic at the top of this Post – or better! You will be able to create stunning graphics – and it won’t cost you a dime. Be as creative as you like – it’s easy, it’s fun, and it’s FREE.
This ‘How To’ article is really a
‘Graphic Design For Dummies & Other Non-geeks’
i.e. for people just like me. Lets get into it!
How to Design Forms Using Mac Word & Mac Preview App
I will show you how to make, and Format, a simple Text Box that can have a hundred different uses for your Blog. You could use this easy Text Box design method to create Newsletter Sign Up Forms, or Optin Forms for anything and everything.
This is also a really easy way to add eye-catching Text Boxes into the body of your articles and posts.
You don’t have to struggle with WordPress software to create Text Boxes – you can do it with Word. Then take a screenshot, optimize the image to maximize Page Loading Speed, and upload it into your Content like any other Graphic. Here’s how to do it.
Step By Step Instructions
1. Open a Word document
2. Create a Text Box
(a) Make sure you are showing the Home tab (No1)
(b) Open up the extra formatting if you normally have this closed – click on the small downward pointing arrow (No2)
(c) Click Text Box (No3) and hold your mouse and drag out an area on your Blank Word document. Alright! We have a Text Box. Now what?
You can change the size and dimensions of your Text Box by dragging the dots around the outside of the box. These drag-able dots also allow you to move your text box around your blank Word Page, if you want to.
3. Create a Colored Background in Text Box
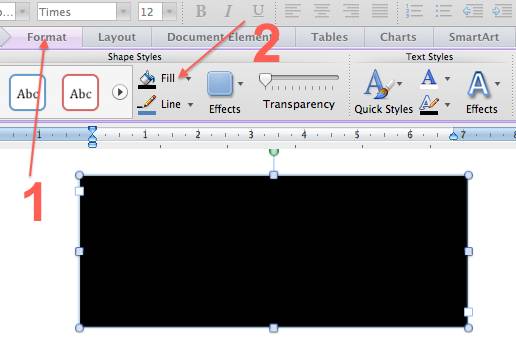
(a) Select Format from the top menu (No1)
(b) Select the Fill Color of the Text Box Background (No2)
Tip: if you don’t see the Format tab in your top menu, just click inside the text box to reveal it.
3. Write Your Copy inside the Text Box
(a) If you have made your text box background black, you will first need to select a contrasting Text Color so you can see what you type. This is selected in the same way we always select Text (Font) Color.
(b) Click inside your text box and type your text.
4. Format Your Text
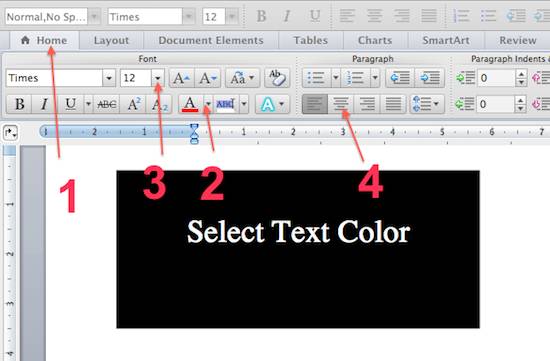
(a) Select Home (No1)
(b) Select Font Text Color (No2)
(c) Select Font Size (No 3)
(d) Select Position of Text inside the Text Box (No4).
5. Insert a Graphic If You Want To – go on, it’s fun!
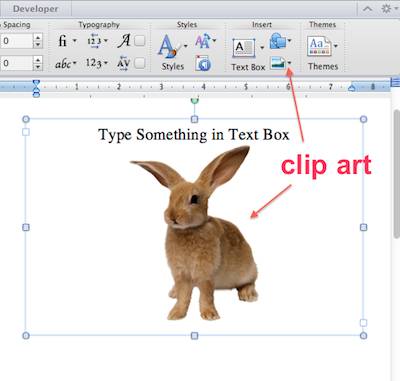
(a) Click on the Insert Graphic icon: it’s next to the Add Text Box Icon.
(b) Choose from various options: from File, from Clip Art Gallery etc
(c) I just grabbed a cute looking Bunny from Word’s Clip Art Gallery….because I can…..and so can you!
How to Get Your Word.doc With Text Box into a Graphic Format
When you are happy with your Design and Formatting, save your Word document to your computer using ‘Save As’. But, still keep the Word Document open – we still have more work to do on it yet.
In order to upload our fancy new Text Box (which might now be a Signup-Form-in-the-making or any other graphic you like) we have to convert it into a .jpg or .png format. We have to do that, so WordPress’ Upload Image’ software will accept it into our Website.
We can make our Text Box into .png or .jpg Graphics Formats using Screenshots.
I use a Mac computer, so I have used Mac’s Preview App, just like I did when I showed you How To Make Free Banners and Logos.
(a) With your Text Box Word document open, open the Preview App.
(b) Go to Preview> File> Take ScreenShot> ‘From Selection’.
(c) Using your mouse to control the area you want to capture with your cross-hairs, take a screenshot of the Text Box.
(4) Save as a .png or .jpg file onto your Hard drive.
You will see that this screenshot above has no surrounding border of it’s own. The border you see surrounding the graphic, is the border that is added by my Theme to all images. It is not a part of the Graphic itself.
In fact, I did create a border around my textbox with the Preview App cross-hairs when I made the screenshot, but, because the original Word Doc was white, this white border does not show up on this blog page, which is also white.
Not to worry! We can fix that. Here’s one I prepared earlier…… . No, it’s not time for some well-earned chips, just yet.
Pretty cool, eh? Well, maybe it is a touch on the cheesy side….but, I’ll explain how I did it.
How To Add a Contrasting Border Around Your Text Box Graphic
Confession Time! I could not manage to put a border around my Text Box using the tools available in Microsoft Word. I did try. There is probably a way to do it. But…I found a work-around, which gives us much more Creative Freedom. Yes!
(a) With your Word document open:
(b) Click Layout from the top menu (No1)
(c) Click Page Background Color (No2)
(d) Select your Contrasting Color (not white) that will be your border – lime green in this case
Now open Preview App again.
Take a screenshot so that the area selected that you wish to capture with the Cross-hairs includes a border around the Background Color of your Text Box – the black part, in this case.
Voila! Now you have your Black Colored Text Box with a Lime Green border. How easy was that!
And it’s in a graphics format that you can upload into your Website, Yes! …easy as!
But wait! Before you upload your graphics and images into your Website, you have to Optimize your Image it at Image Optimizer.net so you can maintain your lightning fast-loading-speed website – it’s lightning fast because you installed the Quick Cache plugin…..didn’t you?
How to Add a Click-able Link Into Your Graphic
If the Graphic you have made is to be used as an Optin form for your Newsletter or Giveaway, you are going to need to add a Link to Your Newsletter Subscription software into the Graphic.
Or, if you have made a graphic to promote an Affiliate product, you need to add your Affiliate Link URL into the graphic. Once you’ve done that, anyone who clicks on your Image/Graphic/Form will be taken to the appropriate destination – whether it is your Affiliate’s website or your Subscribe Form, or anything else you wish to link it with.
See detailed step by step instructions showing how to do that at How to Add Affiliate Links into Images & Text.
OK! NOW you can have some well-earned chips! But wait!
After all my efforts, did you actually sign up for our Newsletter? I think you should, just to show your appreciation for all my hard work 







I’m new in the blogging world, just recently started and I find many of your articles including this one, really helpfull, down to earth tips that one can use.
Cheers!
HI Pablo, thanks for the feedback. Image editing can be a real problem to sort out for beginners. So when I work out how to do something, I can write an article from a beginner’s point of view. I think (hope) that means that I put in every step you need to take. It does mean that my articles can be quite long, but hopefully useful if people can stick with it to the end.
Well that was a great tutorial Carol! I actually have created a number of banners in Word and PowerPoint. I’m no graphic person and some of these graphic programs I find confusing to use.
Now I do know Word and PowerPoint so I find it a lot easier to create something in either of these programs and then crop it and save it as an image.
What a great and easy tutorial. Thanks so much for sharing this one with us.
Have a great week.
~Adrienne
Thanks Adrienne, yes those image editing software programs such as Gimp and Photoshop are a challenge all right, at least that is what I’ve found. And Microsoft Word was available all the time!
Pingback: Get More FREE Banners, & Logo Designs Using Easy Word
Pingback: Build Traffic & Have Fun Making FREE Banners Using Mac Word
Hello,
I bumped into your site while looking for reviews of the Weaver II theme for WordPress and this post also caught my eye. I use a free graphics program called PhotoFiltre (there is a paid version, and it is only like $40.00 US I think). Totally easy to use, lots of great features, lets you work in layers… all sorts of stuff.
Anyway, great site. Like your story from the about page! Sounds like a great life.
Peace!
Hi Mark, thanks for that tip. There are a few image editing sites that I know about but didn’t know about that one. So thanks for the info. And yes I do have a great life, and count myself very lucky for that. Peace to you too.