Do you have Google Plus Buttons on your blog, so that readers can engage with you on Social Media? Maybe you just have a static +1 Icon? Or, do you have a fancy ‘Google Plus Follow Me’ badge with the extra ‘Add Me to Your Circles’ drop down options? No?
How about a ‘Share This’ button on your website? No? You do need to add Google Plus ‘Follow’ Buttons and Badges on your Blog if you want to attract extra traffic.
How does a ‘Follow Me’ Badge do that? By increasing your exposure to a wider Social Network audience via your blog’s reader’s own Google Plus connections – their own Followers and their own Circle members.
It’s no longer enough to only install a Social Media Plugin with a string of static Icon buttons for your readers to click on. That is not really engaging with you, your blog or your article. Clicking on your static Icons, such as ‘Like’ on Facebook, or a ‘+1’ on Google Plus, is only a Recommendation – recommendations are good, but they aren’t really Engagement.
You can do much better than that. You can ‘engage’ much better than that.
In fact…. check out my spanking new ‘Follow’ badge on the right… and why not test it out to see if it’s working by hovering your mouse over the text, ‘Follow’, and adding me to your Circles??
Ana Hoffman tells me, there’s no harm in asking….so you can blame her… 🙂
There is a big difference between receiving a Facebook ‘Like’ recommendation for a post, or a Google Plus ‘+1’ recommendation, and getting an actual ‘Follower’. Recommendations are one thing, but FOLLOWERS are the real deal here. Why? Because Followers see, and share, your content online with the other people who Follow them – People you may never have heard of, and who haven’t heard of you either….before that person Followed you or Shared your Content.
To get this extra level of engagement between you and your readers, you need to add social media Follow Me and Share Buttons to your blog.
Getting the Social Media Terminology Right: Icons, Badges & Buttons.
This confused me for a while, but I think I’ve got it sorted out. Usually, social media ‘Icons’ refer to the red Google Plus ‘G+’ logo, and the blue Facebook ‘Like’ Thumb, and the Twitter icon. These are so called ‘static icons’.
The words ‘Badges’ and ‘Buttons’ usually refer to the same things – larger graphics with the extra option of allowing reader/author Interactions. These are the so-called ‘Interactive’ Buttons, Badges or Icons. There is often some text included, such as ‘Follow Me’, or ‘Add me to Circles’, and on Google Plus, these interactive Badges include drop down Circle-Sharing options. Sometimes people refer to Buttons as Icons, Icons as Buttons, and Buttons when they probably mean Badges….doh.
OK, this article tells you how to install BADGES – because that is what Google and Twitter call them. But if you are searching online for ‘how to’ information, you will probably have more luck if you search for ‘Buttons’. How do I know? Don’t ask, OK? … I do the hard work so you don’t have to….
To see what your Badge will look like when it’s been added to a Page, go to my About Page (in my Menu Bar at the top of the page), where I have already installed my own Badge – twice. As an added Free Bonus, you can even click on those ‘Follow’ buttons (sorry, badges), and get to add me to your Circles….how good is that? 🙂
How to Add Install the Google Plus ‘Follow’ Badge or Button.
1. Go to this link: Google Developers:
Google’s instruction says: ‘Link your Google+ page to your site. Get more recommendations for your site in Google search and grow your audience on Google+’
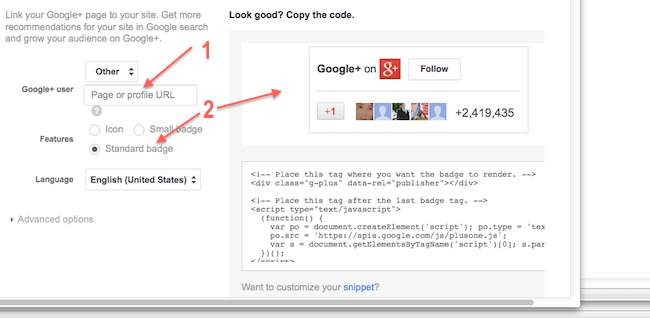
2. Add the URL of the Google Plus page you want to link to, in the text box (No 1) below:
This URL can be your Google Plus Profile Page, or the URL of Google Plus Business Page for your website, if you’ve created one for Google Plus. Business Pages for Websites (not people) are just called ‘Pages’ in Googl Plus. Google Plus Pages for your website(s) are accessed from your Google Plus ‘Profile’ page – and will be accessed from the left hand side Google+ Profile sidebar options.
Depending which Google+ URL you choose to link to here, the Badge HTML Code you get to display on your Website will link to that URL too. You can make a different Badge for as many Google Plus URLs as you want to link to.
3. Demos of Badges: Once you have added your Google Plus URL (at No 1 above), the Demo window on the right of that Google screen (No 2) shows you what each of the different types of Google Plus Follow badges will look like, when it’s customized with your own photo and Google Plus numbers. You can even click on the ‘Follow’ of this Demo Follow Badge and see how the drop down menu shows your own ‘Add to Circles’ and personal Circle options. Neat, eh?
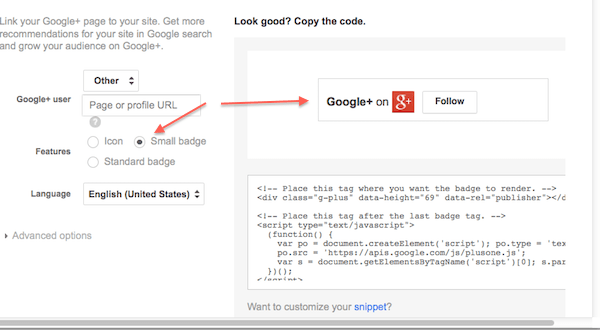
4. Choose Badge Style: On the left of the Demo window, you can see the 3 Badge style choice buttons (No 2): Static G+ Icon, Standard Badge or Small badge. As you select each type of badge, the demo on the right updates to show you what it looks like.
Select the style of Badge you want (No 2 above). and see what each Badge type looks like on the right Demo window. The screen shot above shows what the Standard Badge looks like.
The screenshot below shows what the Small Badge looks like.
5. Advanced Options: this is the fun bit – no really: you get to play with a slider!!
a) Click Advanced Options: (No 1) below. Here you can choose either a light background for your Google Plus Follow badge, or a dark one (No 3) below.
b) Experiment with the Slider Tool: you can choose the width of your Google Plus Follow badge. Note that If you slide that Slider, you can see how larger widths can give you more text showing up in the Badge. Smaller width badges can cut some text. Choose what you like best, and what will fit your sidebar widgets, if you want to add a Follow badge to your Sidebar.
Bonus Tip: by all means check out the ‘Advanced Options: Documentation’ further down the Google webpage if you’re feeling clever – I tried that, gave up, decided I didn’t need to know that (you don’t need to know that), and came back to this easy option at the top….I do the hard work so you don’t have to….:) .
6. Copy and paste your personalized Code – all of it, including what looks like the instructions...I make the stupid mistakes so you don’t have to….
And either paste it into the HTML version of your ‘About’ WordPress Blog Page on your website, or into a Widget to put in your website’s sidebar. Click ‘Update’, and admire your cleverness (briefly).
Trap for Young Players:
If you copy/paste your code into the HTML version of your Blog’s About Page, click ‘update’ and then click the ‘View’ option of the Edit Page to see how it looks…..you will see nothing. But don’t be fooled, this is just Google being mean (my excuse).
Just go ahead and click ‘Publish’, and then ‘View Post’, and it should be there – splendiferous, for all to see (and click on too, please do).
I reckon Google has done it this way to sort the men from the boys, or the wheat from the chaff, or the geeks from the normal, or something like that. It fooled me for a while.
This little editing Challenge also makes positioning your Google Plus Badge kind of tricky, because when you’re trying to line it up in the right place on the page, using the WordPress Visual window, you know it’s there, but you just can’t see it.
Trouble shooting update: this glitch is not just a trap, it’s a very large road block….
I was trying to re-organize my About Page – re-pasting the Google Plus badge into the body of the text….ggrrr.…you copy and paste the code, update, view – nothing, we knew that…but today, View Post….still nothing – maybe 10 times! You can image the expletives I have stopped myself from posting…
Solution: Yay! Finally, at least, this is what worked for me: paste the badge code in twice – yes twice, with the second paste immediately after the first – Eureka! Don’t ask me why…but this worked first time for both Google+ badges on that page. If someone has a better solution, please share it with us. What is Google playing at?
There is still too much white space between my Twitter badge and my Google+ badge, but I dare not tinker with it, now that it’s finally there.
However, The good news is: if you copy paste into a Text Widget for your Sidebar – perfect, first time, and every time. See my sidebar where I added a ‘small’ Google Plus Page badge, using the ‘dark’ version.
Reminder Note: If you have a Google Plus Page as well as a Google Plus Profile, you can select those different URLs in the URL text box while you are generating your badge. Then you can have 2 different badges for the same blog: one that is linked to your Google Plus Profile with your Profile’s Circles, and a different one that links to your Google Plus Page, with that Page’s Circles.
Alright, good luck and have fun…and please click on my Google Plus Follow Buttons, sorry Badges…and Follow me over onto Google Plus, and Twitter too (why not share the fun?)… go on…spoil me!
And…. why not sign up for Email Updates and never miss out on the articles posted here at My Second Million – Just Click on this Subscribe button below:


Pingback: How To Add Twitter Buttons To Drive Social Media Engagement
Lovely tutorial once again 🙂
Yes, I did read about these badges coming up when I was travelling back home but didn’t look into them further until I came across your post once again here.
You are right, it’s tough to have the G+ button everywhere and that’s where these follow badges will come in handy. But I was just thinking as to where I could use them, as I already have the small ones on the top and below my posts and on the sliding floating bar too. I guess anywhere else that I need, I would use these smaller versions, though I hope they are all counted as one and not different from the existing buttons on the blog?
Thanks for sharing. Have a nice week ahead 🙂
Hi Gautham, thanks for your nice Comments. Don’t forget that the small +1 Icons give recommendations, but the Follow Me Badge (of whatever size) is designed to increase your Followers. Getting as many Followers as you can is the main thing you should be aiming for.
The google+ badges look really cool Mayura.
I’ve got a premium plugin on my website for each of the social networks.
I’ve been trying to get more followers on Facebook but sure is hard work.
Maybe it’s time to go with Google+ instead!
Hi Tusher, if you read some of my other Posts you might realize that I’m not a big Facebook fan!
However, I do like Google Plus, and also Twitter. They are both easier to use, and also easier platforms to promote your own articles. And they are much easier to interact with other users and you feel at home from Day 1.
really useful article!
I just have a question in mind, when visiting someone’s G+ profile I usually see how many people following him/her, but in my own profile it shows how many people added me to circles. is there any difference? if so, how I make people follow me instead adding me to circles?
thanks.
Hi Ali, as far as I know, your ‘Followers’ are people who have added you to their Circles. So if you add someone to your circles, you would show up as a Follower in their G+ Profile.
Great description, pictures help.
Still, I cannot get it to work.
Putting in sidebar widget. What I get on the page is the HTML text displaying below my title (for weekly tips follow me on G+)
I am HTML illiterate but a good instruction follower. Have tried many times.
Thoughts?
Have tried several versions- badge, button.
Hi Winifred, it’s really tricky to know exactly what the problem is. I see you have the G icon in your widget which allows people to go to Google+ and Follow you there, which is kind of ‘ok’, but you don’t have the wider version with the drop down Circles option.
Have you noticed that when you go to Google Badges on the left hand side, you can see Badges and a bit further down is a link to Follow Buttons. Maybe you are using the Badge instead of the Follow button?
I don’t know why you would copy/paste HTML code into a widget and then after you have ‘saved’, you see the HTML code and not the proper image that the HTML represents. That has never happened to me.
In other matters: yesterday I enrolled in a 2 year Grad Dip Counseling course……but I don’t think Marriage Guidance will be one of my strengths!
While the description is great, I want to know if there is any way you can put the Google Plus Follow button on the side ways of your website in vertical format and when someone just hover, it pops little bit and visitor can click and follow the site.
Hi caressi, if you mean you want to add Google Plus in a vertical alignment, I don’t think that is possible. If you want the the button to show drop-down Circles, this article here explains how to do that.